Google has already deployed Google Analytics 4 for a while now, but you might still be wondering what it is and how it is different from the original Google Analytics. In this article I will explain to you what Google Analytics 4 (GA4) is, how it is different from Universal Analytics, and why you need to upgrade to a tool that doesn’t seems finished yet.
I will try to answer the following questions
- What is Google Analytics 4?
- How is Google Analytics 4 different from Universal Analytics?
- How to implement Google Analytics 4?
- How to upgrade to Google Analytics 4 (if you are already using Universal Analytics)?
- Why do I need to upgrade to Google Analytics 4?
Google Analytics 4
Already in July 2020, Google released a new version of the original Universal Analytics. They called this platform Google Analytics App + Web. The idea was to unify app and web measurement in Google Analytics, but I think a lot of people got confused by the naming. App + Web implied that it was only relevant for people that had both an App and a Web, but that was not the case. They then decided to ask people that used the tool to give it a new name. That’s how Google Analytics 4 was born, named after the version number.
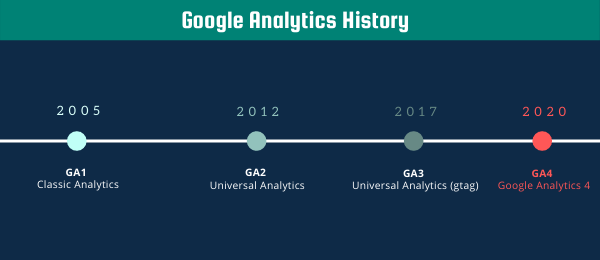
The idea was still the same, a unified way of measuring your apps and websites. Previously, you had to create two different properties if you owned an app and a website. Right now you can use just one property, the GA4 property. To accommodate for this, Google had to change its data model (learn more about this in the next section).
How is Google Analytics 4 different from Universal Analytics?
You might wonder, how different is this Google Analytics 4 that they had to give it a completely new name. Well it is same same but different. You will still be able to recognize a lot of different elements that you have seen in Universal Analytics, such as events, source, dimensions, conversions, custom dimensions etc. But you might struggle to understand how to replicate reports you had in Universal Analytics into the new Google Analytics 4 platform. Below I will explain the biggest changes.
Data Model
If you have worked with Universal Analytics you might know that Google collects data on your website using “hits”. There are different hit types and each of them specifies what is being tracked at that moment. So if someone is looking at a page, you would send a Page View hit to Google Analytics. If someone clicks on a button, and you are tracking that button, then that would have been sent as an Event hit to Google Analytics. If you would have an app, you would have to track views of a ‘page’ with Screenviews. Other less known types of hits are item, social, exception, and timing. Google has simplified this a lot because in GA4 you only have events. No matter whether a person is looking at a page (website), screen (app), or performing an action. All of this is tracked as events.
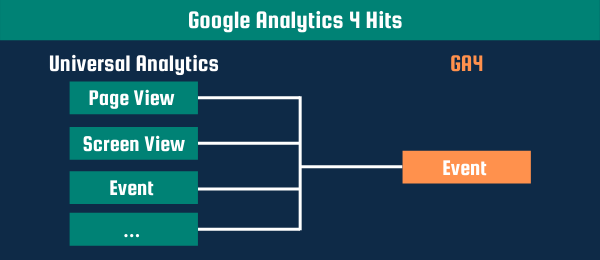
These events in GA4 look slightly different from Universal Analytics in that they do not have event category and event label. Google wants you to move towards an action/object data model. This means that you need to think in what happens (action) and to what does it happen (object). The combination of that will be your event name, or what some people have considered as event action in the past. Some real-life examples are: button clicked, user signed up, payment started, form submitted etc. With each of these events, you are able to send Event Parameters.
Data Streams vs Views
One of the few things you will notice as soon as you create a GA4 property is the absence of Views. A property is still created in an account, but properties only contain Data Streams now. You can define a data stream to let Google Analytics know where data is coming from. There are several types of data streams.
- Web
- iOS
- Android
Compared to Views, Data Streams have a lot less settings that you can customize. You can still define internal IP addresses, and do referral exclusions. On top of that, Google now allows you to modify ånd create events inside Google Analytics.
IP Filters
In contrast to Universal Analytics, within GA4 there is no direct way of filtering out IP addresses. However, you are able to define the IP addresses that you consider ‘internal’. In other words, IP addresses of your office or home internet can be added and will get a traffic_type value (by default: internal). Within the User Interface you will able to create segments based on this traffic_type, so you can still filter out users that have traffic type = internal.
Referral Exclusions
Nothing really changed here. You are still able to add referral domains to a list of referral exclusions. By doing this, you can make sure that these referrals do not change the source/medium of a user.
Important to know is that Google will consider a user to start a new session if its source/medium changes. E-commerce stores might use Paypal or another payment provider that redirects users to their domain to finish the payment. As soon as a user then comes back to the original website, by default their source/medium would change as they now came from for example Paypal. Your transaction/conversion would then be attributed to Paypal rather than the original source/medium. Therefore, you want to add the domain of your payment provider to these referral exclusion list.
Modify/Create Events
Normally if you would want to create or modify events, you would have to change the code snippet on your website or your tags in Google Tag Manager. However, Google now allows you to edit incoming events before they populate your reports. So perhaps you have a slow working developer team, or you just want to quickly change an incoming event without having to touch GTM, then you can use this feature to do this in Google Analytics.
You can do the same for creating events. If you have a certain event that comes in as “button clicked” and you have an event parameter that specifies which button was clicked. Then let’s say one of these buttons is really important for you, so you want that button to have its own event. You can use the create event feature to create an event based on that already existing button clicked event. Another example would be if you want to add an event whenever someone visits the thank you page after a purchase has been made. You can then create an event based on page_viewed = thank_you and call that event “purchase”.
Custom Dimensions/Metrics
As Analytics practitioners we all love our custom dimensions, so as soon as Google announced that GA4 would not have any custom dimensions, everyone freaked out. Well good for us that the GA4 platform is still under construction, and Google decided to add custom dimensions back to GA4. There are still some big differences between the custom dimensions that we used to know in Universal Analytics, and the new GA4 custom dimensions.
Scopes
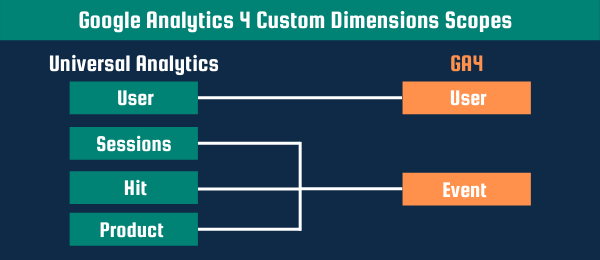
In Universal Analytics we could set the scope of custom dimensions to Hit, Session, User, and Product. In GA4 custom dimensions are either User (User property) scoped or Event (hit) scoped). Logically, any dimension that is relevant for the user, will need to be added with User scope. Any dimension that is relevant for the event or sessions will need to be added with Event scope. If you are wondering how to create these custom dimensions, read the following section about Event Parameters (see next section)
Event Parameters
You might be thinking, but what about event parameters, I thought GA4 had something called event parameters instead of custom dimensions? Yes, that is true. They are actually really interlinked these two concepts. To create custom dimensions, you need to create event parameters. Whenever you send an Event to GA4 (remember, we only have events, we do not have page views or transactions etc.), you can send extra information along. If we take the example of a button click, we can add an event parameter called CTA and capture the call to action text of that button. Or if a user signed up, we can send an event parameter called user_id. Then within custom dimensions, we can set that event parameter as a custom dimension User scope.
Conversions vs Goals
Within Universal Analytics you could set goals that were based on destination (pages) or certain interactions (events). We don’t have Goals anymore in Google Analytics 4, but instead we have conversions. It is actually really easy. Any event can be a conversion event. You only need to mark that specific event as a conversion and you will be able to see those conversions. Furthermore, Google will mark the following automatically collected events as conversions (note that these are app only events):
- first_open
- in_app_purchase
- app_store_subscription_convert
- app_store_subscription_renew
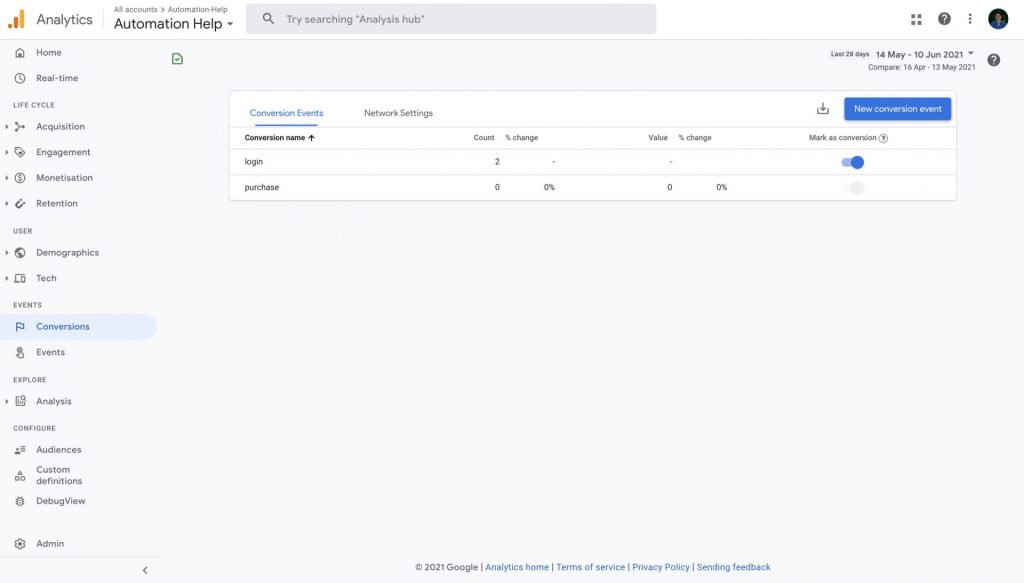
You can mark 30 events per property as conversion. Whenever you have marked an event as a conversion, you are able to add this to any report in GA4.
Analysis Hub vs Custom Reports
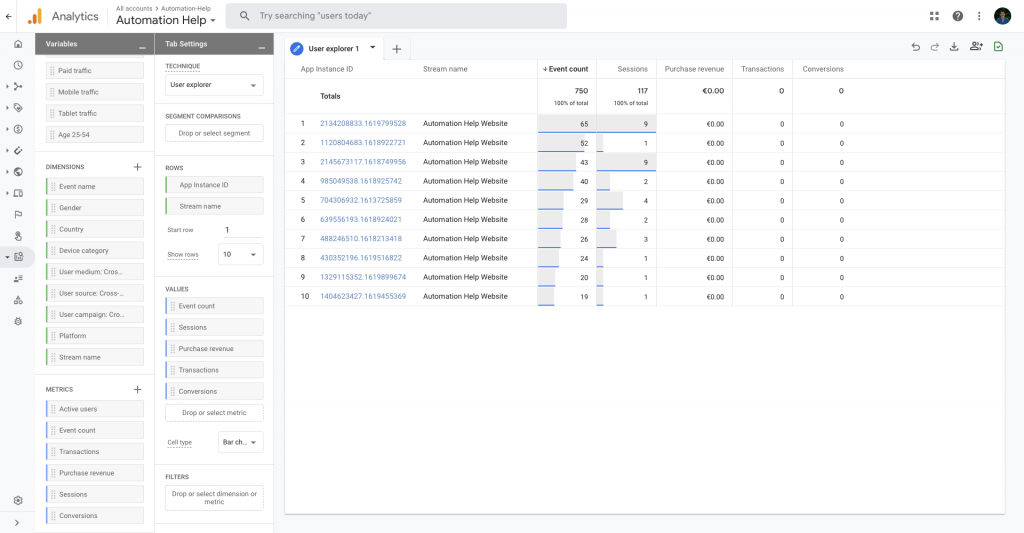
My favourite new feature of GA4 is the Analysis Hub. I was always really disappointed by the custom reports of Universal Analytics. Not only because it looked really outdated, but also because it was not user friendly. Google has made a lot of improvements with the new Analysis Hub. You can easily create templated reports such as:
- Funnel Analysis
- Path Analysis
- Segment Overlap
- User Explorer
- Cohort Analysis
- User lifetime
There is a user-friendly drag and drop functionality and it loads a lot faster than the original custom reports in Universal Analytics
Cross Device Tracking
Google has introduced a way of tracking your users across apps and websites (cross-device). Previously, you had a separate property for your app and a separate one for your website, so you were never able to do this cross-device tracking. If you are wondering if there is also cross-device tracking for just websites, then you are in luck. Google is now also using something called Google Signals (Note that is now also available in Universal Analytics). When users opt-in for Ad Personalisation, Google is able to create a holistic view of user interaction across different browsers and devices.
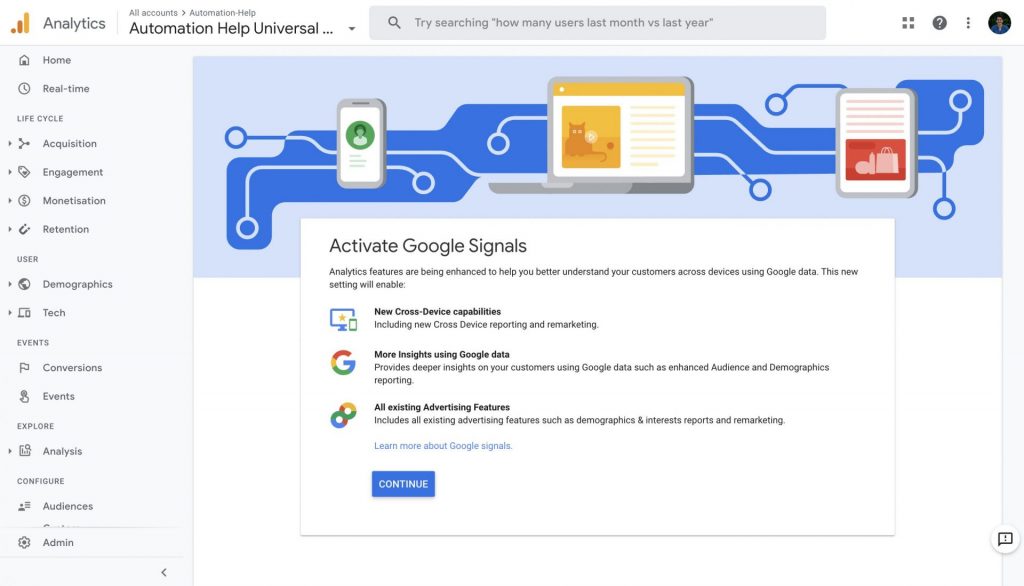
In other words, if you are visiting a website with Google Chrome on your phone (while being logged in to your Google account and having enabled Ad Personalisation), and then you visit that same website with your desktop device (again while being logged in to your Google account), Google is able to tell that you are the same users. Amazing news for marketers, perhaps not so good news if you are concerned about being tracked on the internet (don’t forget that you can always opt-out for Ad Personalisation).
Enhanced Measurement
The most basic implementation of Universal Analytics involves adding Page Views on your website. You were then able to see all the pages that were visited by users. If you wanted to track anything extra, such as for example scrolling depth, link clicks, or site search, you would have to create extra tags in Google Tag Manager or add extra tracking code to your website. Google has made it easier to track these events in GA4 by adding something called Enhanced Measurement. These are events that you can enable and that will be tracked automatically by the GA4 library. So you do not need extra Google Tag Manager tags or extra code snippets on your website. These automatically tracked events include:
- Scrolls
- Outbound link clicks
- Site Search (note: you might need to configure this one)
- Video Engagement
- File Downloads

To me it makes a lot of sense that these events are tracked automatically. If you think about it, scrolls are going to be the same no matter which website you visit. Same thing for video engagement and file downloads.
Measurement Protocol
With the Measurement Protocol you can send data straight to Google Analytics using an HTTP endpoint. In other words, any device that can be connected to the internet can send data to Google Analytics. Another use case for the Measurement Protocol is sending offline data.
Please note that the Google Analytics 4 Measurement Protocol is still in alpha, which is the step before beta. In other words, Google will still make changes to the Measurement Protocol. The Measurement Protocol for Google Analytics 4 still consists of the three parts I discussed before (Method, URL, and Payload). The Method will stay the same (POST request). However, the URL and the payload are different for Google Analytics 4. If you want to learn more about this, read my article about the Measurement Protocol (GA4)
APIs
Google Analytics allows you to retrieve data using their API endpoints. You can even add or edit existing properties and components of Google Analytics (custom dimensions, filters etc.). You can for example using Python to send a request to the Google Analytics server to retrieve specific data from your Google Analytics property. If you are interested in learning about sending requests with Python, please check out one of my other articles. Google Analytics 4 has different APIs than Universal Analytics. In Universal Analytics you could use the reporting and management API, but these endpoints will not work for your GA4 properties. I have written an extensive guide on the GA4 data API, and how you can use it to programmatically retrieve data from your GA4 property.
How to implement Google Analytics 4?
If you already have Universal Analytics implemented, then check out the next section. I assume you have never used any Google Analytics product yet.
Step 1. Create Google Analytics Account
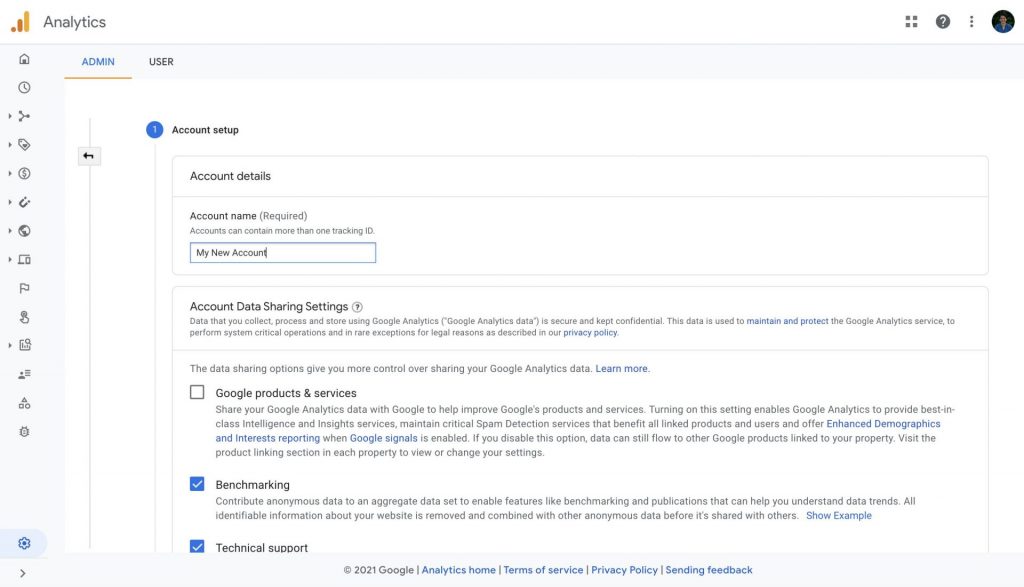
You will have to navigate to https://analytics.google.com/ and create a Google Analytics account. The name of your account should be your company name. You can select the checkboxes that you are comfortable with, and click on the “next” button.
Step 2. Create GA4 Property
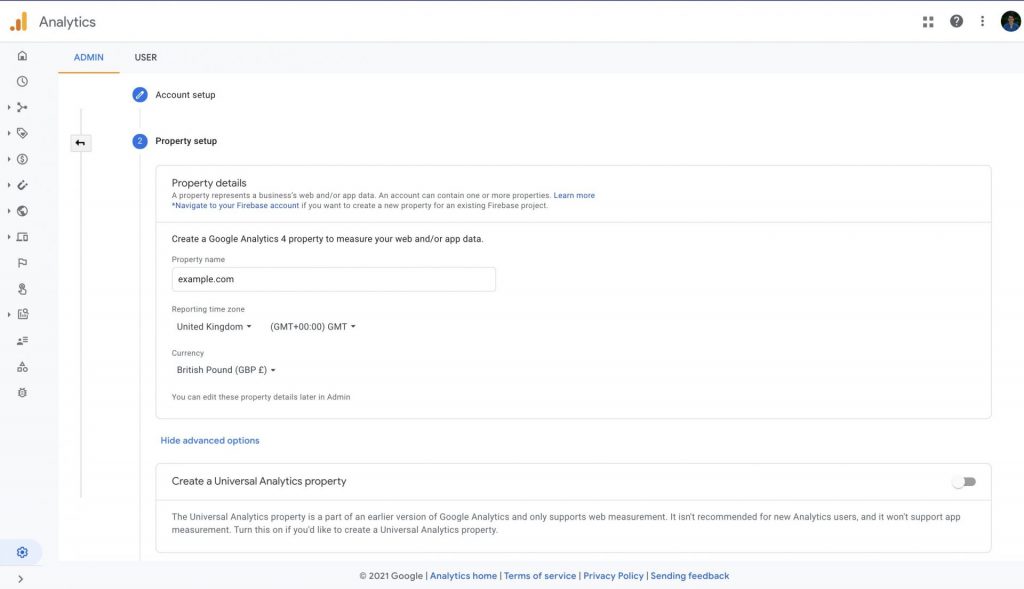
The property name should be the name of your brand. If you are only going to track a website, I would recommend you to use the website URL for this property name. Fill in the relevant reporting zone and currency. Important: If you want to create a Universal Analytics property as well, then you should click on “Show advanced option” and switch the slider to the right (see screenshot below).
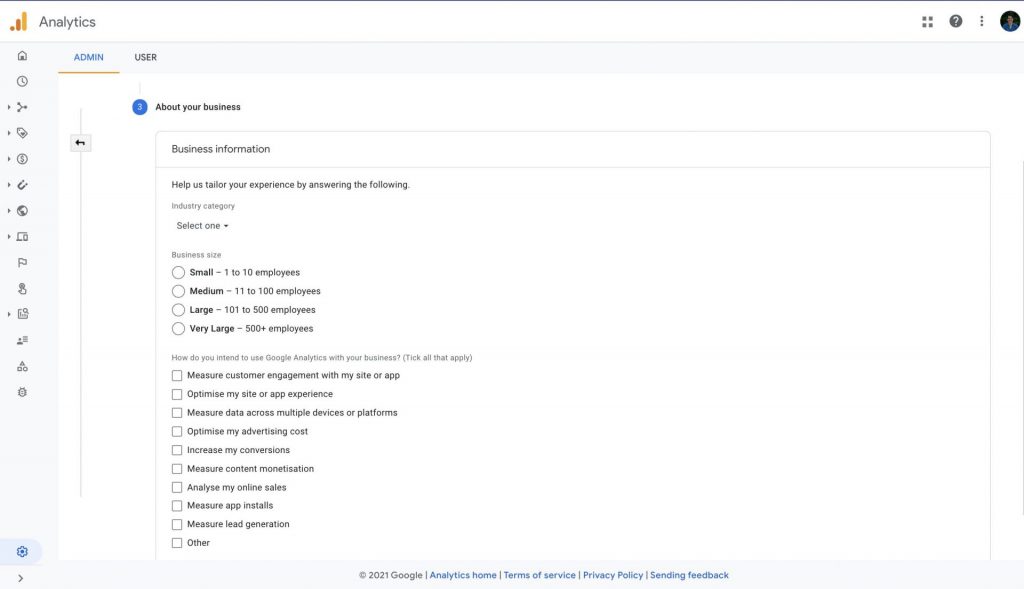
Step 3. Fill in your business information (Optional)
Now you get the option to give Google some information about your business. As far as I know, this will not change anything inside the User Interface. Perhaps Google’s future emails towards you are going to be more tailored. You can skip this step if you want.
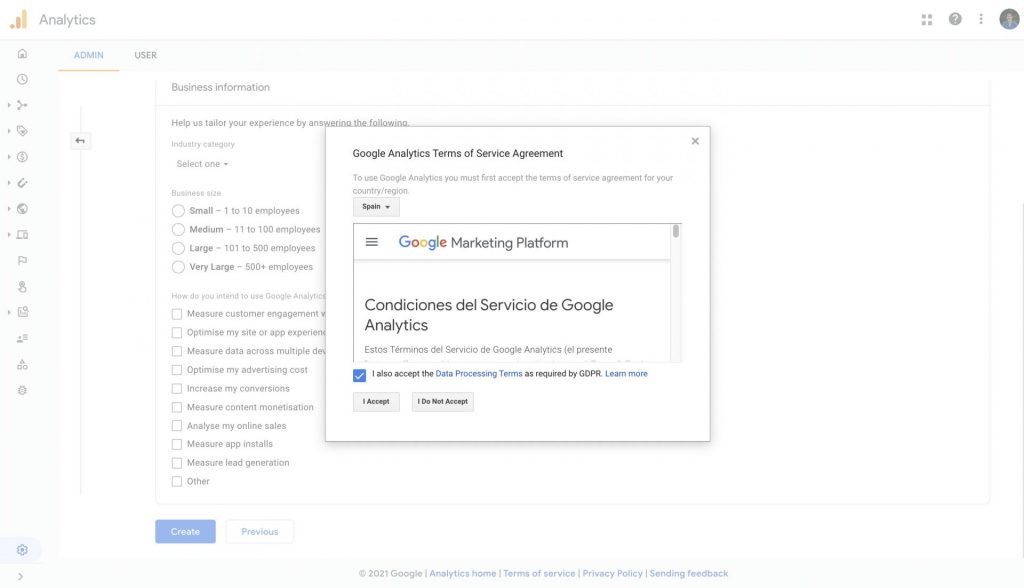
Step 4. Accept the terms and conditions
This is the final step for creating a GA4 property. Select your relevant country and accept the terms and conditions. Congratulations, you have created your GA4 property. But don’t start celebrating too early, you still have to add a datastream to get data flowing into your GA4 property.
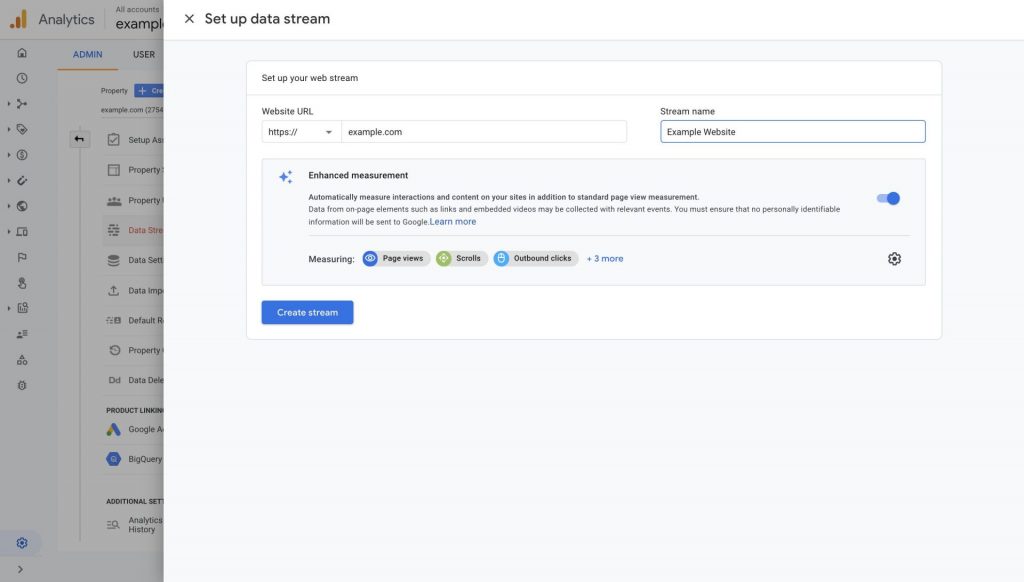
Step 5. Create a Data Stream
Now that you have set up your GA4 property, you have to create a Data Stream to get data into that property. Depending on whether you are tracking an app or a website, you will have to click on the relevant button under “Choose a platform”. In the screenshot below you can see how you can set up a website Data Stream. This is also where you can enable Enhanced Measurement (check section above for more info)
How to upgrade to Google Analytics 4?
We are now assuming you already have a Universal Analytics property and you want to upgrade to a GA4 property. Please note here that you won’t be transforming your Universal Analytics into a GA4 property. Instead, your original Universal Analytics property will keep existing, and you create an additional (GA4) property. This means that you will not be able to see any historical data in this new GA4 property. Read my section about Why you need to upgrade to GA4 now for more information.
Step 1. Go to your Universal Analytics property settings
As we are assuming you already have a Universal Analytics property, you can navigate to its setting to start the GA4 Setup Assistant. If you don’t have a Universal Analytics property please read the section above.
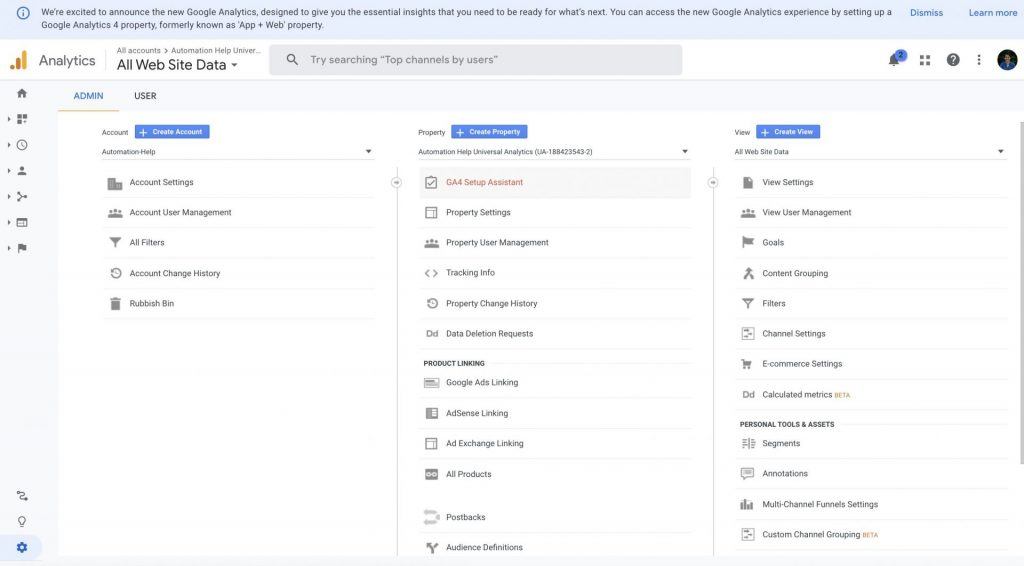
Step 2. Follow the instructions in the GA4 Setup Assistant
Just click through the different steps in the GA4 setup assistant to create or connect a GA4 property to your Universal Analytics property.
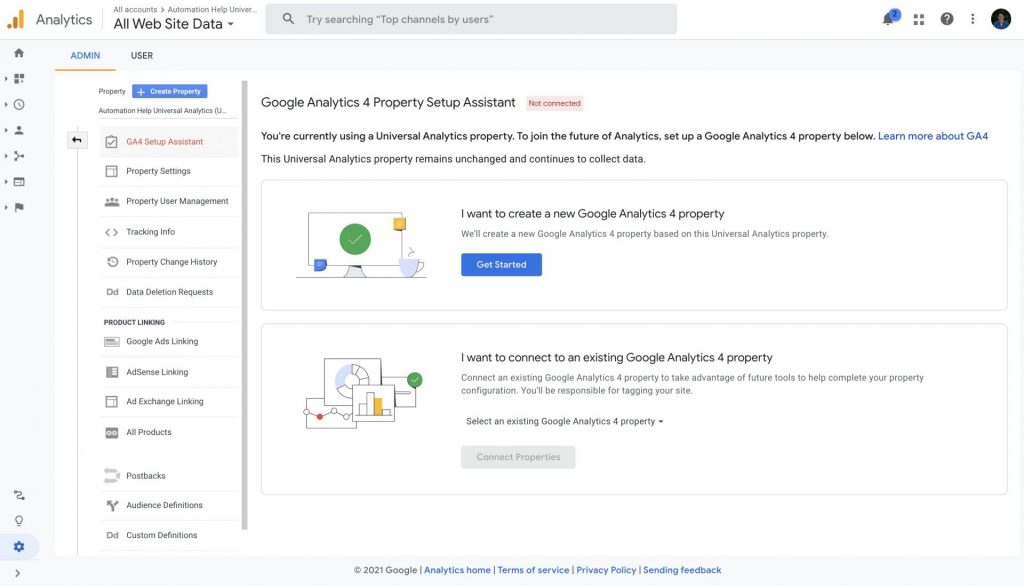
If you have already created a GA4 property, but not linked it to your current Universal Analytics property, then you can select that property in this step. If you are starting from scratch, just select the first option to create a GA4 property.
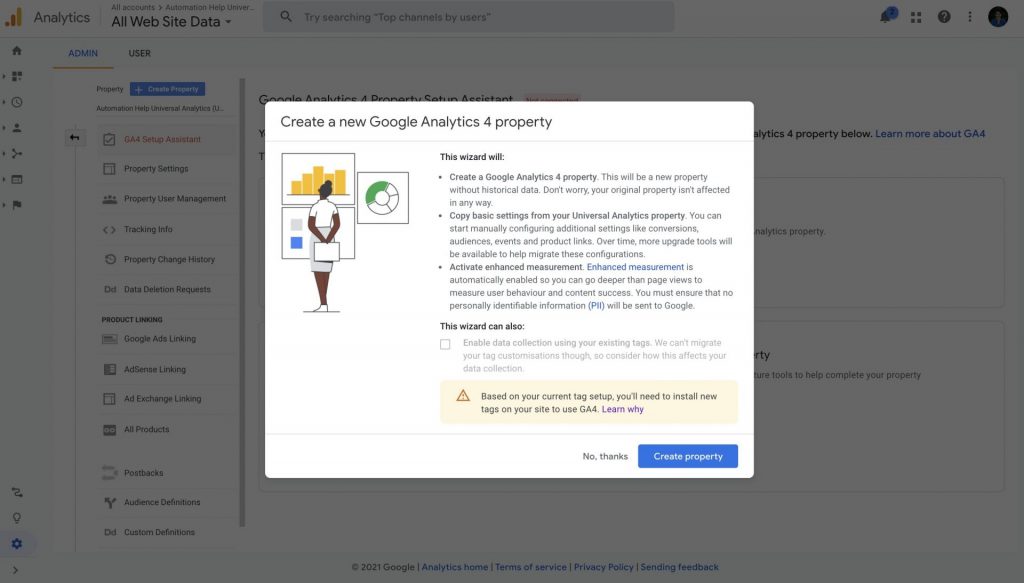
Now if you are using the gtag.js library to tag your website, you are in luck as Google will be able to use your original code snippet and send data to GA4 from there. You are able to enable data collection using existing tags in this step. Important: this will not automatically replicate any custom tags, hence things like cross-domain tracking, cookie settings, advertising features, etc., that you have implemented on your website. This might affect the way you are collecting data in Google Analytics. Fortunately, any events that you were sending with gtag.js will be sent to GA4 as well. Click on “Create property” and you have created your GA4 property.
Step 3. Create a Data Stream
Now that you have set up your GA4 property, you have to create a Data Stream to get data into that property. Depending on whether you are tracking an app or a website, you will have to click on the relevant button under “Choose a platform”. In the screenshot below you can see how you can set up a website Data Stream. This is also where you can enable Enhanced Measurement (check section above for more info).

If you are using Google Tag Manager or another tag management solution to implement Google Analytics, then nothing will be sent to your GA4 property yet. Google does not have an issue way for you to migrate your existing tags to GA4 tags. However, I have created a solution called GA4 Tag Migrator that automates exactly that! Read the section below
Step 4. Migrate your Universal Analytics tags in GTM
You can skip this step if you are not using Google Tag Manager. As mentioned before, you might have a Google Tag Manager container full of Universal Analytics tags, but none of these are automatically send to your GA4 property. Therefore, we will need to duplicate each tag and transform it to a GA4 tag. This is a time-consuming and repetitive task. So don’t worry, that’s where GA4 Tag Migrator comes into play.
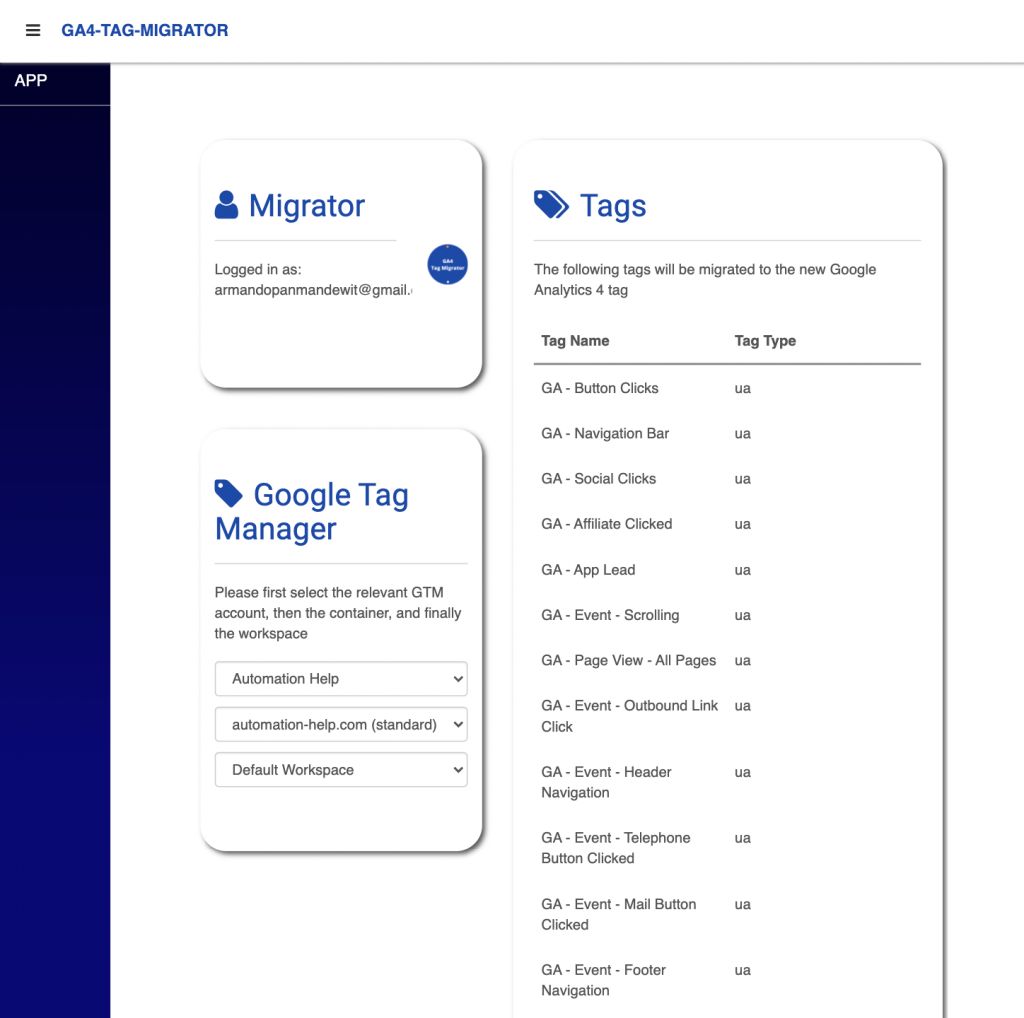
With this automation tool, you can select your relevant GTM container and it will easily duplicate these tags and transform them to GA4 tags. Check out my blog post to get a step by step instruction on how to use this tool. In the tool you will be able to:
- Log in with Google
- Migrate all your existing Universal Analytics property
- Create a GA4 property
- Get 20 free credits (coupon code: EARLY_ADOPTER)
Why you need to upgrade to Google Analytics 4 now
So one of the main questions people ask me when talking about GA4 is: “why do I need to upgrade to Google Analytics 4?” or I hear something that sounds like “this tool is not even finished, and it does not even have all the features that I have in Universal Analytics“. And I think these are really fair concerns. All my websites have both Universal Analytics and GA4 properties. I am even using the Universal Analytics properties more than I am using the GA4 property. However, there are some really important reasons why you would want to upgrade to GA4 now.
Start having data in your GA4 property
The most important reasons of all involves the fact that you only start collecting data in GA4 at the moment that you have created the property. There is no retrospective approach to getting data in that property. As I explained, the data model from GA4 is completely different so all the data that you have in Universal Analytics will not be moved to GA4. You want to start collecting data in your GA4 property, so when the time comes, you already have data in that property. How annoying would it if GA4 is finally at the point that you want to start using it, but then you don’t have any data that you can use in that property.
GA4 is the future
I know that this sounds really cliché, but it is true. GA4 is the future. In other words, at some point there will not be any Universal Analytics anymore. GA4 is being improved while we speak, and at some point it will have all the features that you are looking for. Start playing around with the new tool, as this will be the platform that you will be using in the future. The sooner you get used to this new platform, the better.
It’s not that difficult
Honestly, if we were talking about days of implementation that had to happen in order for you to get to GA4, I would understand the resistance a bit better. But it is really not that difficult. As you have seen in my sections above, creating a GA4 property does not take that much time. And if you are using gtag.js library, your events can already be sent to GA4 easily. For those using GTM, I would recommend you to use the GA4 Tag Migrator and you will have all your Universal Analytics tags migrated in minutes. Upgrade to GA4 now and just wait until you think the platform is worth being used. But then as soon as it is ready, you already have your data in there!
I hope you have enjoyed learning about the new GA4 property, how it is different from Universal Analytics, how you can create/upgrade. And most importantly, why you need to upgrade to GA4 today. If you have any questions, do not hesitate to ask them below.
