In this Google App Script Tutorial for Beginners, I will explain to you the basics of Google App Script, which will include how to read values in Google Sheet, how to write values, how to show alerts, and how to add a button to trigger your function. I will show this using an example where we will create Google Analytics views using the Google Analytics API. If you are only interested in the Google Sheet that automates the creation of Google Analytics properties and views, you can click on the following link:
Google Sheet: Automate the creation of Google Analytics properties and views (Check below for instructions)
Google App Script
Google App Script is available to automate Google Sheet actions. It is almost identical to JavaScript, although it has more built-in classes that allow you to interact with Google Products. This allows you to connect to APIs, do complicated calculations, and export all of that to a Google Sheet. You can even create complete add-ons with user interfaces so you can create a small useful tool. All of your code is run on the Google servers and can be triggered in different ways. One of these triggers includes time triggers, thereby allowing you to trigger your script at a certain time of the day. Alternatively, you can trigger your code whenever a document, such as a Google Sheet, is opened by a user.
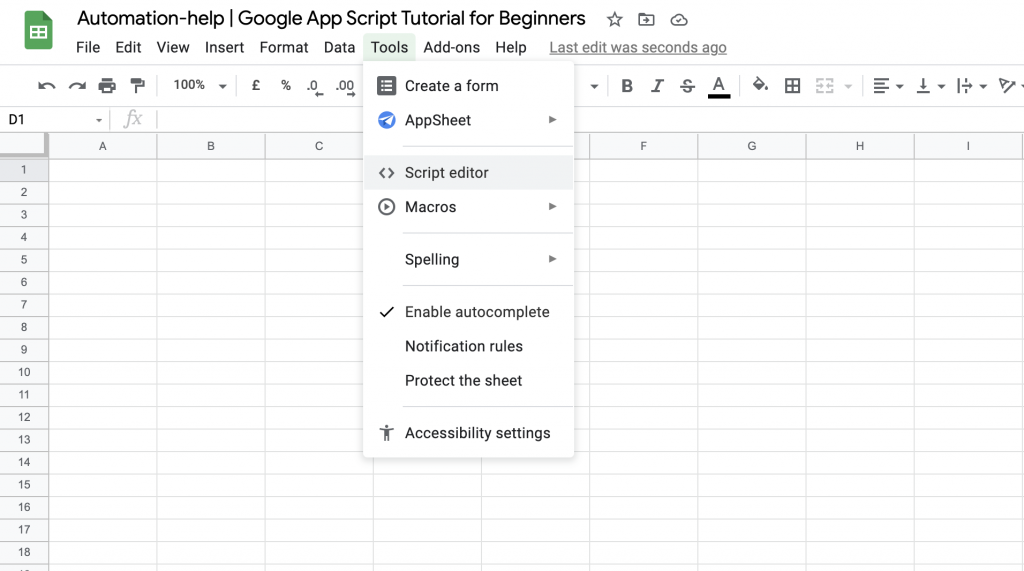
You will start by creating a new Google Sheet, and you can give it a relevant name. Subsequently, you can find the “Script Editor” under “Tools”, which will open a new tab.
Now, you can see an empty script editor and once again, you can give it a relevant name. On the left you can find different sections:
- Overview
- Shows basic information about your script
- Editor
- The area where you can edit your script
- Triggers
- Allows you to trigger your script on certain events (e.g. sheet is opened) or time-intervals
- Executions
- Shows you when your script has been executed
- Project Settings
- Additional advanced settings

Adding the Google Analytics API Service
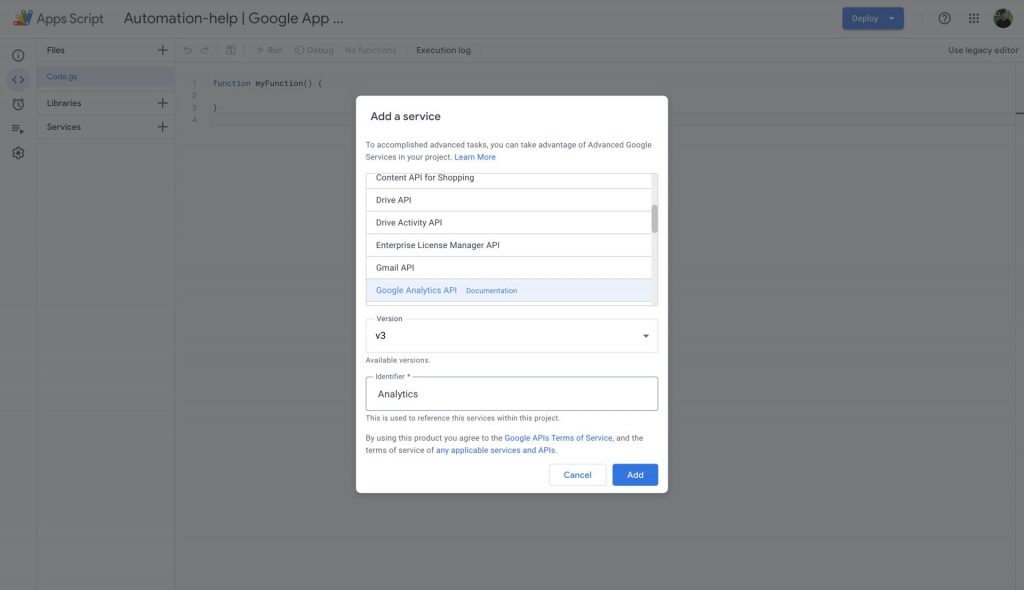
Although this is not something you would think to see in a Google App Script Tutorial for Beginners, it is not as complicated as you think. As you will be connecting to the Google Analytics API to make changes in Google Analytics, you will need to add this API. Therefore, on the left, you should click on the plus sign next to “Services”. Then scroll down until you see the Google Analytics API and click on “Add”. This allows you to use all the functions of the Google Analytics API by typing “Analytics” (e.g. Analytics.Management.Account.Lists() )
Reading values in Google Sheet
With Google App Script you can read values of any cell in your Google Sheet. First, you will need to define the Spreadsheet, hence the document that you are working on. Then you need to define the sheet, which by default is “Sheet 1”. Afterward, we can read the value of a certain cell by using a combination of .getRange() and .getValue()
var ss = SpreadsheetApp.getActiveSpreadsheet();   //Get reference to active spreadsheet for when setting values in certain sheets;
var ui = SpreadsheetApp.getUi();
var mainSheet = ss.getSheetByName('Sheet 1')
var propertyName = mainSheet.getRange("B5").getValue();
The variable propertyName will contain the value of cell B5. As we will need some input, please copy the following table to your Google Sheet (Sheet 1)
| Create Google Analytics Properties/Views | |
| Running this function will create a property with three views: – Main – Test – Raw Data | |
| Account Name | Test Account |
| Property Name | Test Property |
| Website URL | http://example.com |
| Currency | EU euro |
Show an Alert Pop-Up
Ideally, you would want to warn users that a script is going to run and give them the option to continue or cancel. Below you can find the function that will run as soon as a user clicks on a certain button (the button will be explained in the next section). The ui.alert() function takes three arguments and will return a response.
- The title of the alert
- The descriptive text of the alert
- Optional buttons of the alert
The response in this case will be either a yes or a now, and with a simple if statement we can decide which functions need to run accordingly.
function startFunction() {
  var accountName = mainSheet.getRange("B4").getValue();
  var propertyName = mainSheet.getRange("B5").getValue();
  var response = ui.alert('Are you sure you want to create new views?', 'This will create a new property called: '+propertyName+ ' \n and three new views in account: ' + accountName, ui.ButtonSet.YES_NO);
// Process the user's response.
if (response == ui.Button.YES) {
  Logger.log('The user clicked "Yes."');
  createViews()
  ui.alert('The views have been created, navigate to your Google Analytics account to see them!')
} else {
  Logger.log('The user clicked "No" or the close button in the dialog\'s title bar.');
  ui.alert('Creation canceled')
}
}
Create a button and assign a script
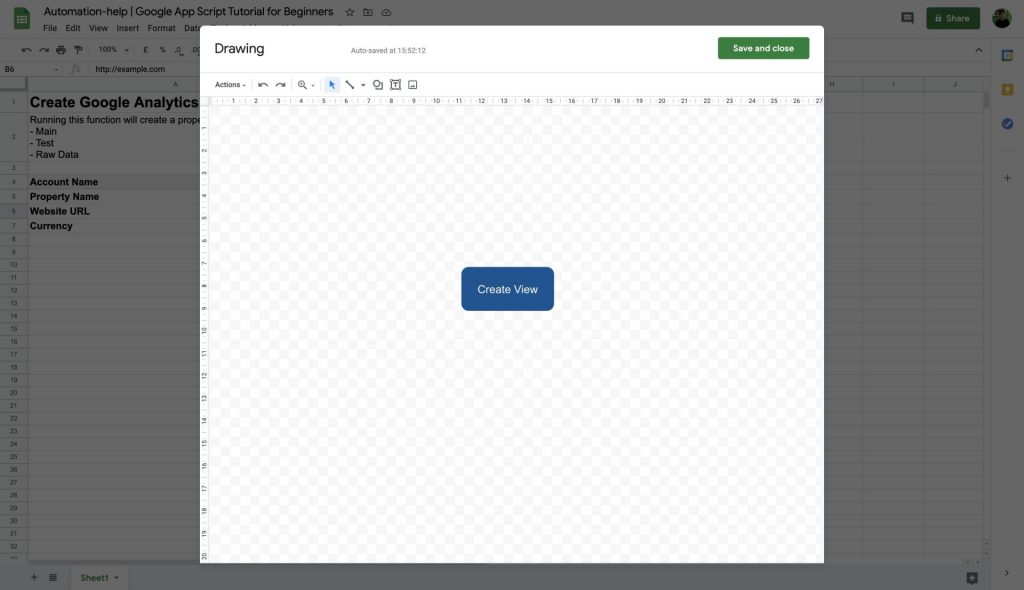
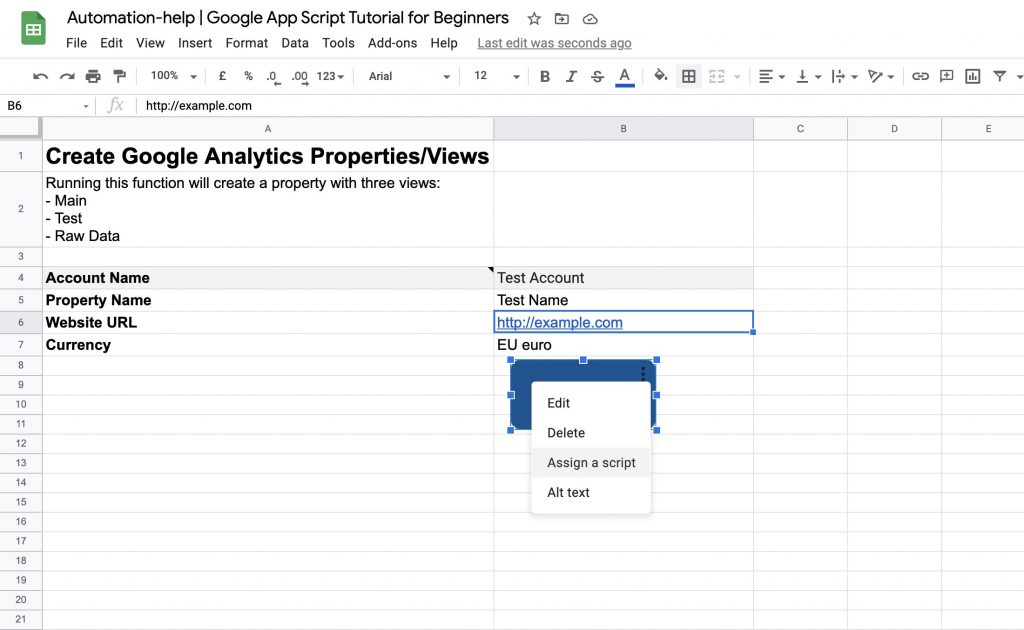
You can find “Drawing” under “Insert” in the top bar of your Google Sheet. There you can create a drawing for a button that you will be using to launch your script. When you are happy with how your button looks like, you can click on “Save and close”
Now you can hover over your button and click on the three dots in the top right corner. Click on “Assign Script” and fill in “startFunction”. Now as soon as you click on that button, your recently created function will run. You will see the pop up we created, but nothing much will happen as we have not created the rest of the functions yet
Get Script Timezone
We will continue with the createView() function, which includes a part where you will get the time zone of the Google Sheet (by default the time zone of the user that created the sheet). We do this with the Session.getScriptTimeZone() and this will return a time zone from the TZ database. Once again if you run this script, not a lot will happen as we are still missing some functions.
function createViews(){
  var currency = getCurrency()
  var timezone = Session.getScriptTimeZone()
  var accountId = getAccountId()
  var propertyId = createProperty(accountId)
  var viewList = ["Main View", "Raw Data View", "Test View"]
  for (var x = 0; x < viewList.length; x++){
      var viewObj = {
            'name': viewList[x],
            'timezone': timezone,
            'currency': currency
  }
  console.log(viewObj)
    var view = Analytics.Management.Profiles.insert(viewObj, accountId, propertyId);
  }
  var propertyId = view.webPropertyId
  return propertyId
}
VLookup function
Within Google App Script you can create a function that has the same functionality as a regular VlookUp. For this step I recommend you to copy the content of the Sheet called “HIDDEN – Currency” in the following Google Sheet: Automate the creation of Google Analytics properties and views. Paste the values in a separate sheet in your document. The for loop in the function below loops over each row and then returns the second column if the value matches the first column.
function getCurrency (){
  var currencySheet = ss.getSheetByName('HIDDEN - Currencies')
  var last=currencySheet.getLastRow();
  var data=currencySheet.getRange(1,1,last,2).getValues();// create an array of data from columns A and B
  var value = mainSheet.getRange("B7").getValue();
  console.log(value)
  for(x=0;x<data.length;++x){
    if (data[x][1]==value){break} ;// if a match in column B is found, break the loop
      }
return data[x][0]
}
Throw Errors
Catching errors is an important part of a script execution. With Google App Script you can throw an error with the throw new Error () function, which takes a description of the error as its parameter.
function getAccountId(){
  var searchName = mainSheet.getRange("B4").getValue();
 accountList = Analytics.Management.Accounts.list().items;
  for (var x = 0; x < accountList.length; x++){
    if (accountList[x].name == searchName){
      var accountId = accountList[x].id
      return accountId
    }
  }
  throw new Error( "Account name not found in the list of your accounts, please make sure it is an identical match" );
}
Create Google Analytics Property
We are only missing one more function, which creates the Google Analytics property using the Google Analytics API. As you can see a function within Google App Script can have a parameter as well (just as in normal JavaScript).
function createProperty(accountId){
  var propertyName = mainSheet.getRange("B5").getValue();
  var websiteUrl = mainSheet.getRange("B6").getValue();
 property = Analytics.Management.Webproperties.insert({
                'websiteUrl': websiteUrl,
                'name': propertyName
            }, accountId);
  console.log(property)
  return property.id
}
Write values in Google Sheet
The final step of this Google App Script Tutorial for Beginners is outputting the tracking code. When we create a Google Analytics Property we will get its Property ID, with which we can create a tracking code. That code snippet is the part of the code that you will add to your website. If you are running a WordPress website, I have created an article on how to add this code snippet to your WordPress website. To create this code snippet, we will edit the startFunction a bit. The code for writing and reading values in Google App Script look almost the same. You need to select a range and then with the .setValue() you can set the value of a cell.
function startFunction() {
  var accountName = mainSheet.getRange("B4").getValue();
  var propertyName = mainSheet.getRange("B5").getValue();
  var response = ui.alert('Are you sure you want to create new views?', 'This will create a new property called: '+propertyName+ ' \n and three new views in account: ' + accountName, ui.ButtonSet.YES_NO);
// Process the user's response.
if (response == ui.Button.YES) {
  Logger.log('The user clicked "Yes."');
  var propertyId = createViews()
  var trackingCode = "<!-- Global site tag (gtag.js) - Google Analytics -->\n<script async src=\"https://www.googletagmanager.com/gtag/js?id="+propertyId+"\"></script>\n<script>\nwindow.dataLayer = window.dataLayer || [];\nfunction gtag(){dataLayer.push(arguments);}\ngtag('js', new Date());\n\ngtag('config', "+propertyId+"});\n</script>"
  mainSheet.getRange("B14").setValue(trackingCode);
  ui.alert('The views have been created, navigate to your Google Analytics account to see them!')
} else {
  Logger.log('The user clicked "No" or the close button in the dialog\'s title bar.');
  ui.alert('Creation canceled')
}
}
Instructions
When you have added all the code by following the instructions above, or you have copied the Google Sheet using this link, you can automate the creation of a Google Analytics property with three standard views:
- Main View
- Test View
- Raw View

The very first time that you click on Create Views, you will see a pop-up where you have to authorize the script to read and write your Google Analytics data. Do not worry, nothing dangerous is happening. You can check the source code of the Google App Script and read the complete article to understand what exactly is happening in the script. Please note that the creation of a Google Analytics account can not be automated, so you will still want to go to Google Analytics to create an account manually. However, in the future, you can use the Google Sheet to create new properties and views. The script will output the tracking code that you could then use to Add Google Analytics to your Website.
I hope you have enjoyed learning how you can automate the creation of Google Analytics properties and views in this Google App Script Tutorial for Beginners. Do not hesitate to ask any questions in the comments below. Also, if you would like something similar for the new Google Analytics 4 properties, just let me know.
Pingback: How to add Google Analytics to WordPress - Automation Help
Pingback: Google Analytics Automated Reports using Google Sheet - Automation Help