
If you are just starting with WordPress you are probably interested in knowing more about the traffic on your website. You might want to know how many users are visiting your website, how long they are staying, how they ended up on your website, and which content they are looking at. In this article, I will explain to you how to add Google Analytics to WordPress.
Google Analytics
Good Analytics is a powerful tool that allows you to get key insights about the traffic on your website. There are some small differences between the free and paid version, but if you are just starting a website this is nothing you need to worry about. With Google Analytics you will be able to do the following (and many more):
- Understand where you users are coming from (e.g. organic search, paid search, social, referrals etc.)
- See how long your users are staying on the website and how many pages they visit (e.g. time on page and pages per session)
- Find out which content your users engage with (e.g. pageviews)
- Discover how many users are on your website at this current moment (e.g. real-time report)
- Reveal the demographics of your audience (e.g. age, interest, gender)
Step 1. Create Google Analytics Account
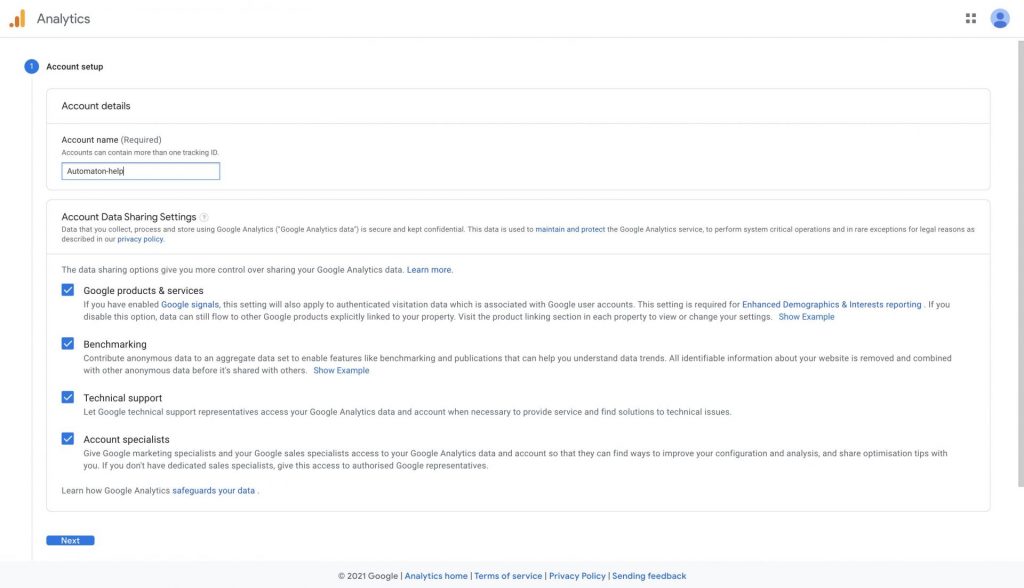
The first step on how to add Google Analytics to WordPress starts with the creation of a Google Analytics account. Navigate to the Google Analytics site and if you have never created an account you will see the following screen. Fill in the desired account name.
Step 2. Create Google Analytics Property
Manually
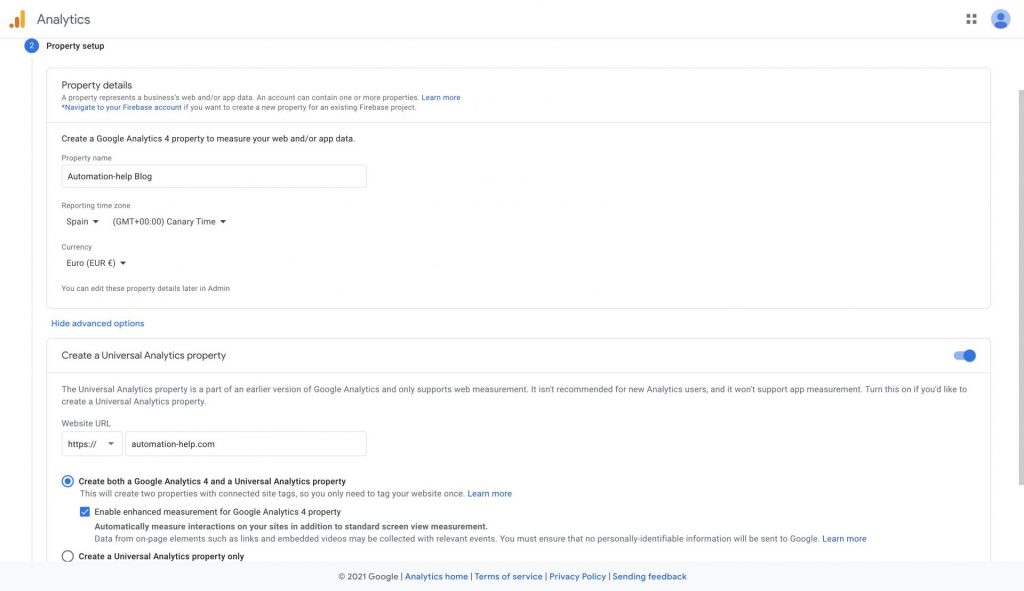
Although we can automate this part using the Google Analytics API, I will continue showing you the manual approach. If you had never created a Google Analytics account, Google will ask you to create a property. Fill in the desired property name, your timezone, and your relevant currency. As Google has recently added a new version of its platform called Google Analytics 4, you are creating a GA4 property by default. However, this new version of the platform does not have all the functionality that the legacy Universal Google Analytics has. Therefore, I recommend you to click on the “Create a Universal Analytics property” that will allow you to create both types of properties.
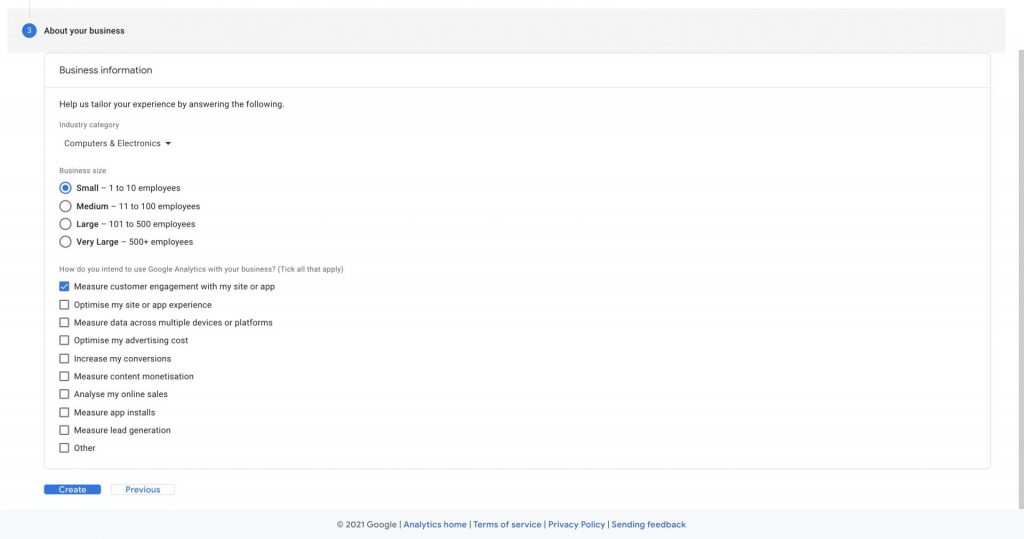
For the last step in this manual process, you will need to add some information about your business. Fill in the relevant information about your company, and click on create. Click on the country for your business and accept the Google Analytics Terms of Service Agreement to finalize the creation.
Automated
As you are on automation-help.com, I also have an automated approach for creating Google Analytics properties. Please check my Google App Script Tutorial for Beginners article if you are interested in creating properties in an automated manner using Google Sheets.
Step 3. Copy your Tracking Code
Google Analytics 4
You will now see the datastream for your GA4 property. Click on “Global site tag (gtag.js)” under the heading “Tagging Instructions”. Please add this somewhere to your notes, as we will be needing this later. It should look like the following piece of HTML code.
<!-- Global site tag (gtag.js) - Google Analytics -->
<script async src="https://www.googletagmanager.com/gtag/js?id={MEASUREMENT_ID}"></script>
<script>
  window.dataLayer = window.dataLayer || [];
  function gtag(){dataLayer.push(arguments);}
  gtag('js', new Date());

  gtag('config', "{MEASUREMENT_ID}");
</script>
Universal Google Analytics
We also want to write down the tracking code for the legacy Universal Google Analytics property. You can click on your property name in the top left corner to see a list of your properties. Click on the legacy property (without GA4 in its name) and then click on the only view “All Website Data”.

You can find the tracking code by clicking on “Admin” in the bottom left corner. Then in the middle column “Property”, you will need to click on “Tracking Info” > “Tracking Code”. It looks similar to the previous HTML code we have seen. Please copy the code as we will need it for the next step.
<!-- Global site tag (gtag.js) - Google Analytics -->
<script async src="https://www.googletagmanager.com/gtag/js?id={PROPERTY_ID}"></script>
<script>
  window.dataLayer = window.dataLayer || [];
  function gtag(){dataLayer.push(arguments);}
  gtag('js', new Date());

  gtag('config', {PROPERTY_ID});
</script>
Step 4. Add Google Analytics Tracking Code to WordPress
Considering GDPR and CCPA
I have seen many guides that explain to you how to add Google Analytics to WordPress, without talking about the implications of adding this tracking platform. I am not a legal expert, but I would recommend you take into account the privacy of your users. In my opinion, we should not try to think about how we can implement a sneaky approach that will make us get away with tracking users. Instead, we should respect the consent choices the user makes. Tracking users on your website requires some kind of consent functionality. Although I try to limit the number of plugins I use on my website, I do use a cookie banner plugin. This will also allow you to easily create a privacy policy page and a cookie policy page.
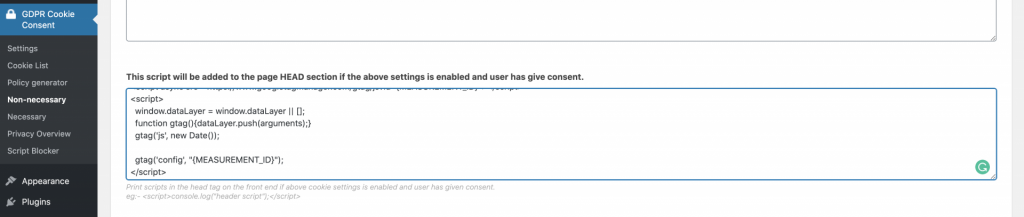
For this specific Cookie Banner Plugin, we can add the tracking codes as non-necessary cookies in the following manner. Do not forget to include your own Measurement ID in the code, so do not copy-paste the exact code I have mentioned in my guide. After having saved these settings, users that navigate to your website will first need to accept the cookies before Google Analytics starts collecting data.
Using Google Tag Manager
The above-mentioned implementation might be sufficient for you if you are only interested in tracking the default metrics in Google Analytics. However, if you want to add more tracking such as event tracking for specific buttons, conversion tracking, scroll-tracking, and/or video-tracking you will want to use Google Tag Manager. This will allow you to easily create tags that fire exactly when you want them to fire. For example, if you have a download button on your page, you can add a trigger for that button that fires an event tag. Moreover, you can specify the exact values that need to be sent to Google Analytics.
Navigate to Google Tag Manager and click on “Create Account” in the top right corner. Fill in your relevant information and click on “Create”. After agreeing to the User Agreement you will see another code snippet that looks like the following two code snippets. Instead of adding the Google Analytics code snippets to your Cookie Banner Plugin, you will add the GTM snippet that looks like the code below (add it to the HEAD section)
<!-- Google Tag Manager -->
<script>(function(w,d,s,l,i){w[l]=w[l]||[];w[l].push({'gtm.start':
new Date().getTime(),event:'gtm.js'});var f=d.getElementsByTagName(s)[0],
j=d.createElement(s),dl=l!='dataLayer'?'&l='+l:'';j.async=true;j.src=
'https://www.googletagmanager.com/gtm.js?id='+i+dl;f.parentNode.insertBefore(j,f);
})(window,document,'script','dataLayer','{GTM_ID}');</script>
<!-- End Google Tag Manager -->
The second code snippet (below) needs to be added to the Body section in your Cookie Banner Plugin. This code snippet allows GTM to load on devices that do not have JavaScript enabled, although that happens rarely.
<!-- Google Tag Manager (noscript) -->
<noscript><iframe src="https://www.googletagmanager.com/ns.html?id={GTM_ID}"
height="0" width="0" style="display:none;visibility:hidden"></iframe></noscript>
<!-- End Google Tag Manager (noscript) -->
I will not bore you with the creation of tags and variables, but instead, you can download the container file in a JSON format. You can then easily import this file into your recently created container.
Click here to download the Basic GA Implementation Container
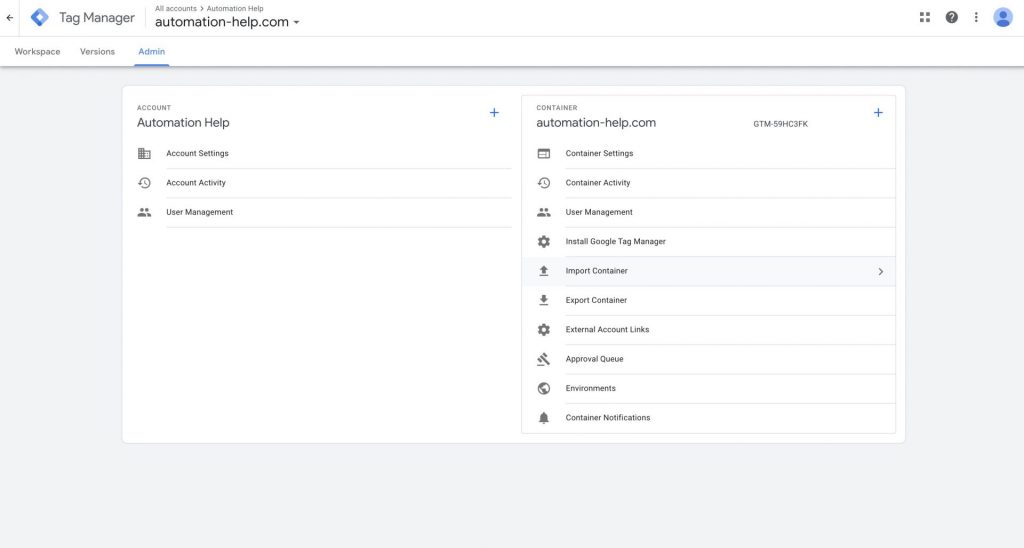
We want to import this JSON file into your container so you should navigate to your recently created GTM container. Then in the top menu, you click on “Admin”, which will show you both the Account settings as the Container Settings. In the column of the latter you will see an option to import Container (see screenshot below).
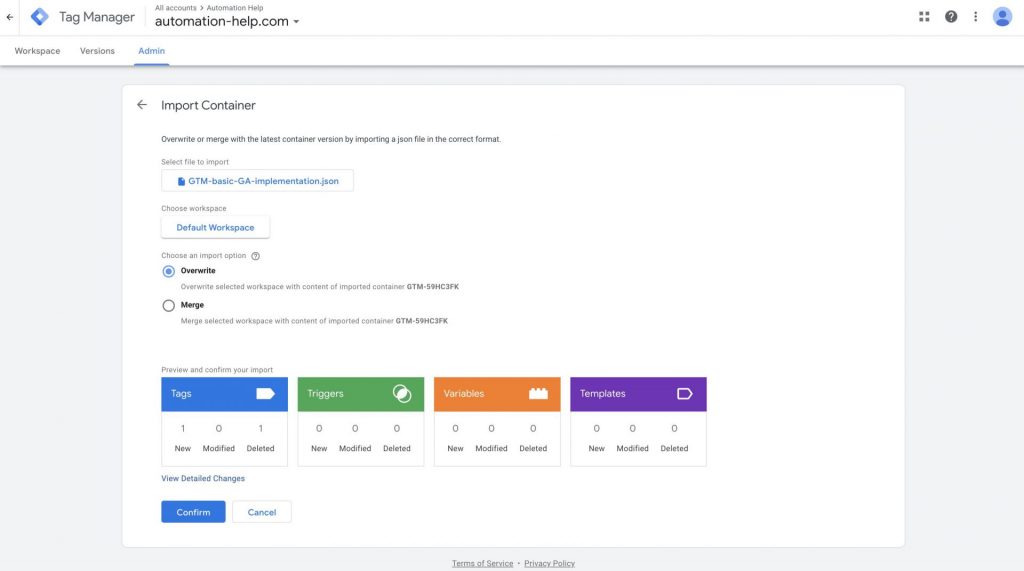
Select the JSON file that you have downloaded before and choose the “Default Workspace”. As you are importing into an empty workspace it is fine to click on “Overwrite”. However, if you have already added items to your workspace then you should choose “Merge”. Click on “Confirm” and you should now have some basic tags and variables.
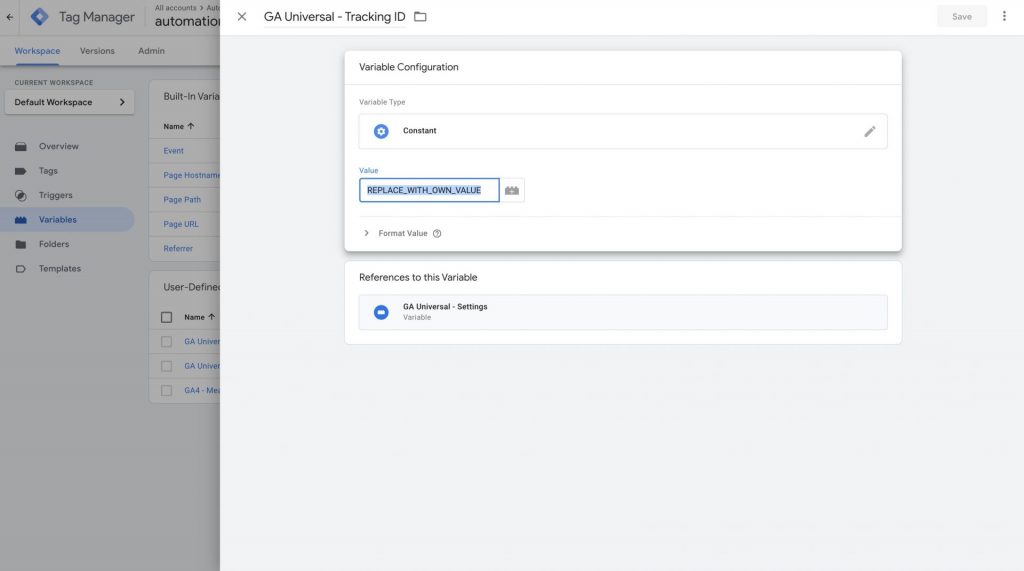
Now you will need to go to “Variables” and edit the “GA Universal – Tracking ID” and “GA4 – Measurement ID” variables. Add the values that you have obtained when creating the Google Analytics properties. For GA Universal it should look like “UA-1234567-8” and for GA4 the value should look like “G-XXXXXXXXXX”. See a screenshot for the GA Universal variable below.
The last step includes publishing your workspace. You have made changes to your GTM container but none of these changes are currently live. Click on “Submit” in the top right corner and add a version name such as “Basic GA Universal and GA4 implementation”. If you want you can add a description specifying that you have only added pageviews. Then click on “Publish” and you are done! If you have added the GTM code snippet to your Cookie Banner Plugin, then Google Tag Manager will trigger Google Analytics as soon as a user accepts the cookies on your website.
Without a Plugin
For sake of learning, I will explain how to add Google Analytics to your website without a plugin. However, please note that this is not recommended as you will not have any control over when Google Analytics is triggered. Please check the section above to understand why I recommend adding Google Analytics using a Cookie Banner plugin.
You can add the tracking codes you have copied in the previous sections directly to your theme functions. However, ideally, you want to create a child theme. This will ensure that any changes you make will be persistent even when your theme needs an update. Please check the WordPress documentation to figure out how to add a child theme. Personally, I like to use this plugin, and then I delete it after having created the child theme. Make sure that you include the header.php file and that you have activated the child theme.
Within WordPress navigate to “Appearance” > “Theme Editor” and click on your Theme Header (header.php) file. You can add both tracking codes just above the closing head tag “</head”>“. Click on “Update File” and your Google Analytics tracking is added to your website. Now as soon as someone navigates to your website, Google Analytics will track their user behavior.
I hope you enjoyed learning how to add Google Analytics to WordPress. Please be conscious about how you add Google Analytics while taking into account your users’ privacy. If you have any questions, do not hesitate to leave a comment below.
Pingback: Google App Script Tutorial for Beginners - Automation Help
Pingback: How to update to the new Google Analytics 4 Property using Google Tag Manager - Automation Help