In this article, you will learn how to create a simple web scraper using Selenium with Python. Web scraping is the extraction of data from a website. Many different tools exist with specifically that purpose, with the most popular one being Scrapy. However, for this article I will use Selenium, as I think it is great to have some visual feedback when starting with web scraping. When you run Selenium you will be able to see all the actions that you have programmed and this just increases the satisfaction you get from your automation! Additionally, some websites require JavaScript to load certain elements on the page, which with Scrapy you will not be able to achieve directly. The steps to create a simple web scraper using Selenium are listed below:
Set up Selenium
Selenium’s main purpose is “automating web applications for testing purposes”. However, as mentioned before there are arguments to be made for using Selenium to scrape a website. Conceptually you can imagine the Selenium driver to be the controller of your browser. The driver will tell your browser what to do and you will be able to load all dynamic elements that are dependent on JavaScript. The driver is an actual (executable) file on your machine. I have already written an article on an easy setup for Selenium Web driver, so please check it out if you want to save some time.
Download Google Chrome
For the sake of your understanding of Selenium, I will also explain the manual process of setting up Selenium. I will use Google Chrome as it is the most used browser. If you do not already have Chrome installed, please use this link to download it.
Download Chrome driver
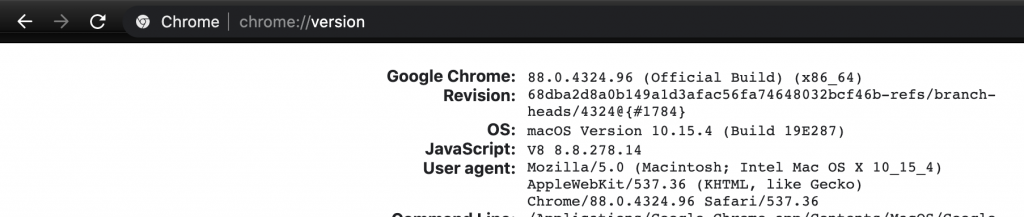
You will need to download the Chrome web driver, which you can consider a small program that will be telling your Google Chrome what to do. The web driver is dependent on the version of Google Chrome that you have just download. Type “chrome://version” in the address bar and check the value after “Google Chrome:” to find your version.
You can the navigate to https://chromedriver.chromium.org/downloads to download the correct Chrome web driver for your Chrome version.
Download Selenium
If you are familiar with coding with Python, you probably know how to use pip to install modules. In your terminal, you can use the following line of code to install Selenium.
pip install seleniumFor the people running Python for the first time, I would recommend you to download Python using Anaconda. After you have installed Python, you should also be able to run “pip install selenium” in your terminal.
Initiate Selenium
After having finished the above steps, we can finally start writing some Python code. I would recommend you create a new folder and create a fresh Python file. You should also move the Chrome driver file to this folder so it will be easy to find.
from selenium import webdriver
from selenium.webdriver.support.ui import WebDriverWait
from selenium.webdriver.support import expected_conditions as EC
from selenium.webdriver.common.by import By
from selenium.webdriver.chrome.options import Options

chromeDriverPath = r'/users/armando.panmandewit/documents/python/selenium/chromedriver'

chromeOptions = webdriver.ChromeOptions()
driver = webdriver.Chrome(chromeDriverPath, options=chromeOptions)
You should replace the chromeDriverPath variable with the path to the Chrome driver you have downloaded. Only specify the folder and not the complete file path.
Write your simple Selenium web scraper
You are now ready to tell the Selenium web driver to which website it needs to navigate and which actions to take on that website. As an example for this article I will use the e-commerce shop “El Corte Ingles” and we will pretend to be interested in the availability of the Playstation 5. The actions that we want the driver to execute are:
- Navigate to the Playstation 5 Product Page
- Minimize pop-up window
- Check the text of the buy now button
1. Navigate to the Playstation 5 Product Page
Within Selenium you can navigate to webpages with the driver.get function.
driver.get("https://www.elcorteingles.es/canarias/videojuegos/A37046604/")When you run all of the above-mentioned code, you should see a Chrome browser window open that navigates to the e-commerce website by itself. Congratulations, you have just automated browser interactions using Selenium. If you are seeing an error message, you can leave a comment below and I will try to help you out.
2. Minimize pop-up window
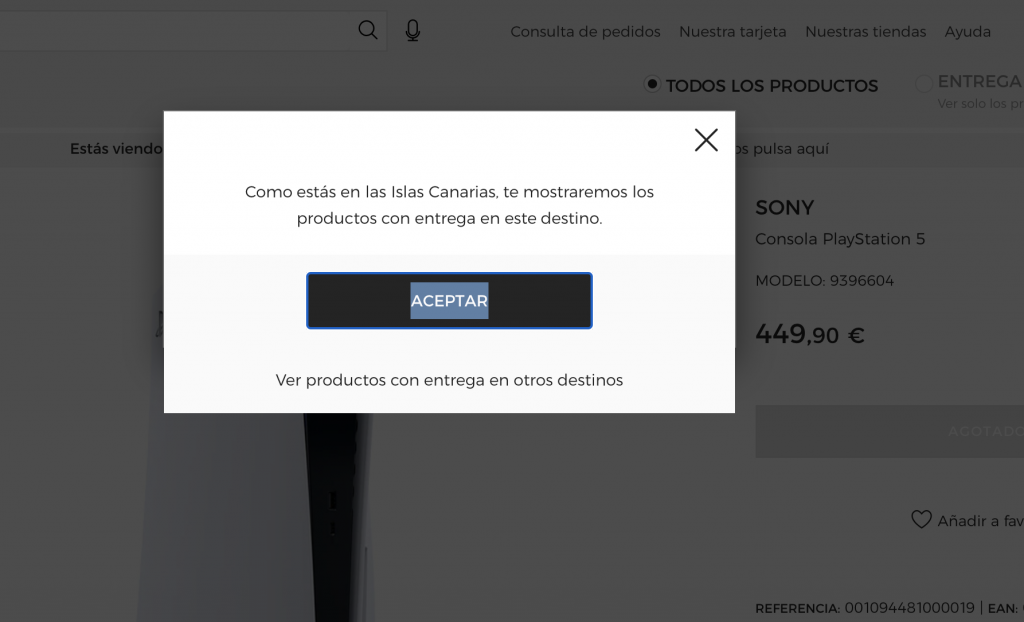
Each time you run Selenium, it will use a fresh Chrome version. This means that it does not contain any cookies and that any website will consider you to be a first-time visitor. For our e-commerce website that results in a pop-up window telling you that you are on the Canary island version of the website. We are not really interested in this pop-up so we are going to click on the accept button. Side note: With Selenium, you are able to load existing Chrome profiles and save them, you can check my article about Selenium Web Driver Chrome Profile in Python.
The most robust way of automating this interaction, is by waiting explicitly for the accept button to show and then clicking it. To wait explicitly means that you wait for a certain condition to occur before executing your next action. Please check my article on How to use explicit waits in Selenium web driver to learn more about this kind of wait.
css_selector = ".js-modal-footer-accept"
wait = WebDriverWait(driver, 20)
wait.until(EC.element_to_be_clickable((By.CSS_SELECTOR, css_selector)))
driver.find_element_by_css_selector(css_selector).click()
In the code above, you can see how we define the CSS selector for the accept button element, then explicitly wait 20 seconds for that button to be clickable, and finally click on the accept button.

You can find the CSS selector by right-clicking on the accept button and clicking on “inspect”. The Chrome Developers tools will open and the relevant element will be highlighted in the Elements tab. If this is your first time working with CSS selectors, I recommend you to check out the W3 School CSS Selector article.
Check the text of the buy now button
As we want to know if the Playstation 5 is sold out, we need to check the text of the buy now button. A little bit of Spanish lessons here, “Agotado” means “Sold Out”.

css_selector = ".js-buy-button"
element = driver.find_elements_by_css_selector(css_selector)
if len(element) > 0:
    information = element[0].get_attribute("innerText")
print(information)
Using the same method as described in the previous section, we can get the CSS selector for the buy now button. In this case, we are not going to wait explicitly for the element to be visible, as the page has already fully loaded when we waited for the pop-up element. With driver.find_elements_by_css_selector we are immediately finding elements and selecting those. Just to be sure that we do not get an error message, we do add an if statement to see if our function returned any elements.
Congratulations, you have just learned how to create a simple web scraper using Selenium.
If you have followed all of the previous steps you should now have a simple web scraper that will print the status of the Playstation availability using Selenium! In the future, I will write an article on how to use Google Cloud Platform to schedule this Python code. Ideally, you want this script to run every hour and send you an email when the availability has changed. I have already written this code so if you do not want to wait for the article you can check out my GitHub repo.
Please let me know what you think about the article by commenting below.
Pingback: Install Python using Anaconda - Automation Help
Pingback: Python | Dict to JSON - Automation Help