One of the more complicated tasks within web scraping and user testing automation is the use of rotating proxies. Within this article, I will explain what proxies are, and how you can set rotating proxies using Selenium with Python.
Selenium
The Selenium web driver allows you to automate QA processes, as well as create scrapers. With this driver, you can load JavaScript on your website, which is not possible with modules like Scrapy, and Urllib. Conceptually you can imagine the Selenium driver to be the controller of your browser. The driver will tell your browser what to do and you will be able to load all dynamic elements that are dependent on JavaScript. The driver is an actual (executable) file on your machine.

Rotating Proxies
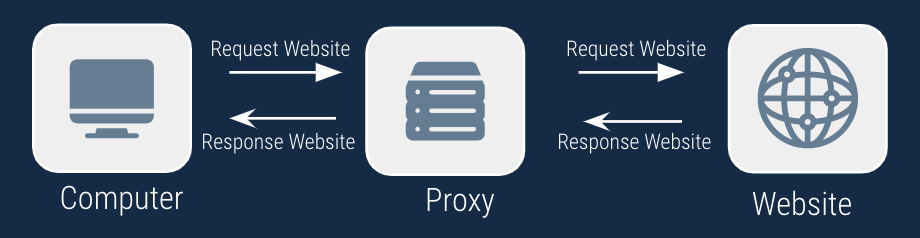
Proxies are becoming more popular as people become more aware of privacy. You can consider a proxy to be like a server/computer that sits between you and the website you are visiting. A proxy relays the information you are requesting from a website through itself. In other words, my request first reaches a proxy and then the proxy requests the webpage and sends the information back to you. This can be useful if you want to see the German version of a website while being located in France. The graph below illustrates how that would work.
You can rotate proxies so that each test or scrape that you execute on a website, is executed from a different server. You are changing your public IP address in order for the website to see you as a completely different user.
How to Set Rotating Proxies in Selenium
Before you are able to run any of the codes mentioned below, you should set up Selenium on your device. You can check one of my other articles to find an Easy Set Up Selenium. After you have set up Selenium, you can import Selenium using the following code:
from selenium import webdriverI assume you already have a list of proxies that you want to use. However, if you need to obtain a list of proxies, you can check the following link. In the future, I will write an article on how to obtain a list of proxies that you can use for Selenium. In your project directory, you should have a file called proxies.txt that looks like this
37.120.169.116:8080
47.254.90.125:8080
47.57.188.208:80
We will rotate over these proxies using the following code:
f = open("proxies.txt", "r")
list_of_lines = f.readlines()
if not any("x " in s for s in list_of_lines): # add locator to first item in file when running for first the time
    list_of_lines[0] = "x " + list_of_lines[0]
for index, line in enumerate(list_of_lines):
    if "x " in line:
        next_index = index + 1
        if index == len(list_of_lines) -1:
            next_index = 0

        list_of_lines[index] = list_of_lines[index].split("x ").pop() # update current line
        proxy = list_of_lines[index]
        list_of_lines[next_index] = "x " + list_of_lines[next_index] # update next line
        break
The code above will make sure that we update the file each time we run the script. We add the prefix “x ” to the line that we are using at that moment. Each time you run the script, the prefix will move from the current line to the next line. The current proxy is being saved and can be passed to Selenium in the following manner:
chrome_options = webdriver.ChromeOptions()
chrome_options.add_argument(f'--proxy-server={proxy})
driver = webdriver.Chrome(options=chrome_options, executable_path="chromedriver/chromedriver")
driver.get("http://httpbin.org/ip")
body_text = driver.find_element_by_tag_name('body').text
We assume the chrome driver executable file is located in a directory called chromedriver (which would be the case if you followed the steps in Easy setup Selenium Web Driver). Chrome will navigate to http://httpbin.org/ip and print the public IP address that you are using.
Authenticated Rotating Proxies
Rotating proxies that require authentication (username and password) are more difficult to add to Selenium. There is a workaround that makes use of adding a Chrome Extension to your Chromedriver when you are initiating it. You can do this by creating a zip file that contains two simple files
- manifest.json
- background.js
The manifest JSON file will contain some main information about the Chrome Extension you are creating and refers to the Background JavaScript file. This background file is a JavaScript function that contains the functionality of your Chrome Extension.
proxy_info {
	"host": "HOST"
	"port": "PORT"
	"username": "USERNAME"
	"password": "PASSWORD"
}

manifest_json = """
        {
            "version": "1.0.0",
            "manifest_version": 2,
            "name": "Chrome Proxy",
            "permissions": [
                "proxy",
                "tabs",
                "unlimitedStorage",
                "storage",
                "<all_urls>",
                "webRequest",
                "webRequestBlocking"
            ],
            "background": {
                "scripts": ["background.js"]
            },
            "minimum_chrome_version":"22.0.0"
        }
        """

background_js = """
        var config = {
                mode: "fixed_servers",
                rules: {
                singleProxy: {
                    scheme: "http",
                    host: "%s",
                    port: parseInt(%s)
                },
                bypassList: ["localhost"]
                }
            };

        chrome.proxy.settings.set({value: config, scope: "regular"}, function() {});

        function callbackFn(details) {
            return {
                authCredentials: {
                    username: "%s",
                    password: "%s"
                }
            };
        }

        chrome.webRequest.onAuthRequired.addListener(
                    callbackFn,
                    {urls: ["<all_urls>"]},
                    ['blocking']
        );
        """ % (proxy_info["host"], proxy_info["port"], proxy_info["username"], proxy_info["password"])
After you have declared these variables you are now able to create the zip file containing those two files. We will use the Zipfile module to make this a lot easier. Do not forget to add the relevant values for your proxy (host, port, username, and password) to the proxy_info variable.
import zipfile

pluginfile = 'authenticated_proxy_plugin.zip'
with zipfile.ZipFile(plugin_file, 'w') as zp:
    zp.writestr("manifest.json", self.manifest_json)
    zp.writestr("background.js", self.background_js)
chrome_options.add_extension(plugin_file)
Now you can pass that chrome_option variable as an argument when initiating your driver. This allows you to add any authenticated proxy to Selenium.
I hope this article Python Selenium Rotating Proxies has helped you. Please let me know if you have any questions in the comments below.
Pingback: Install Python using Anaconda - Automation Help
Pingback: How to Scrape Google Search Result Page using Python - Automation Help