In the last year Shopify has introduced Custom Pixel. Which according to them “should help you collect customer events on even more pages of your online store, such as the checkout and post-purchase pages“. This is especially relevant since their launch of Checkout Extensibility. If you don’t have any idea what custom pixels are, where to find them, how to install them, and how they apply to the latest checkout extensibility, then this article is for you.
What is a Shopify Custom Pixel?
Introduction
Shopify Custom Pixels are pieces of codes that are loaded in a so-called sandbox environment. Which means they are loaded on your website without having direct access to your website. In technical terms they are loaded in iFrames, which I always call “webpage inside a webpage”.
Why did Shopify introduce Custom Pixels?
Shopify has added this “for improved security and control over the data that you send to third parties“. Normally, when you load the Google Analytics library, all elements on the websites are available for this script.
This is also how for example Google is able to make the Automatically collected events work. As Google’s script has access to all elements, they can add listeners to link elements and send a specific event to GA4 as soon as someone clicks one of those links. As you might have already guessed, this won’t work in a Shopify Custom Pixel because the link elements are not present in the iFrame.
How do Custom Pixels relate to Checkout Extensibility?
In February 2023, Shopify already announced they were going to get rid of checkout.liquid file. They gave the following timeline
- August 13, 2024: Deadline to upgrade your Information, Shipping, and Payment pages.
- August 28, 2025: Deadline to upgrade your Thank you and Order status pages, including your apps using script tags and additional scripts.
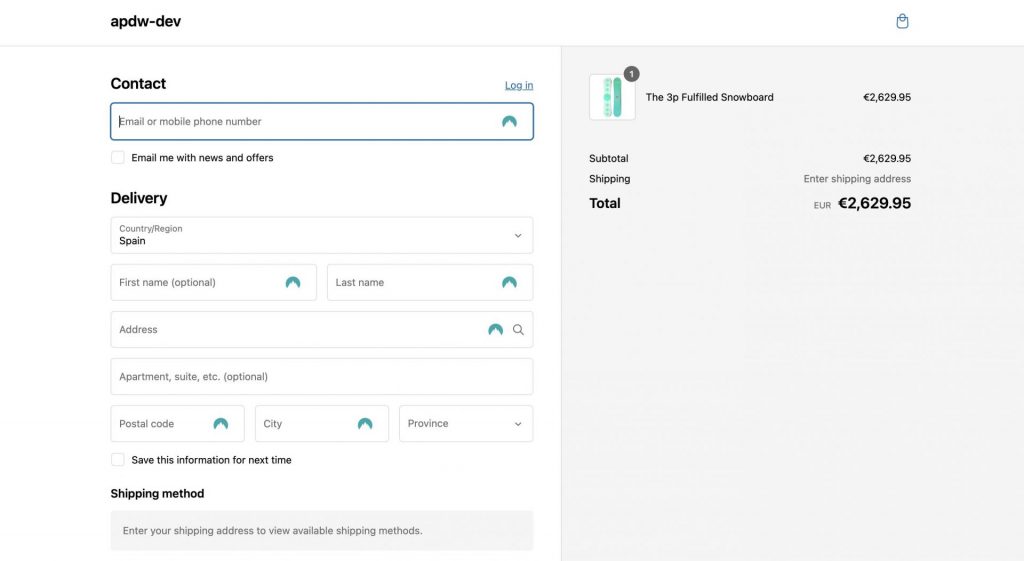
This means that you won’t have direct access to the code on the checkout pages of Shopify (see example of a checkout page above). As most companies had added their tracking scripts to that exact checkout.liquid file, it means their tracking will stop working.
Therefore, Shopify has given everyone an alternative: the custom pixels. These pixel will also load on the checkout pages.
Where to find Shopify Custom Pixels?
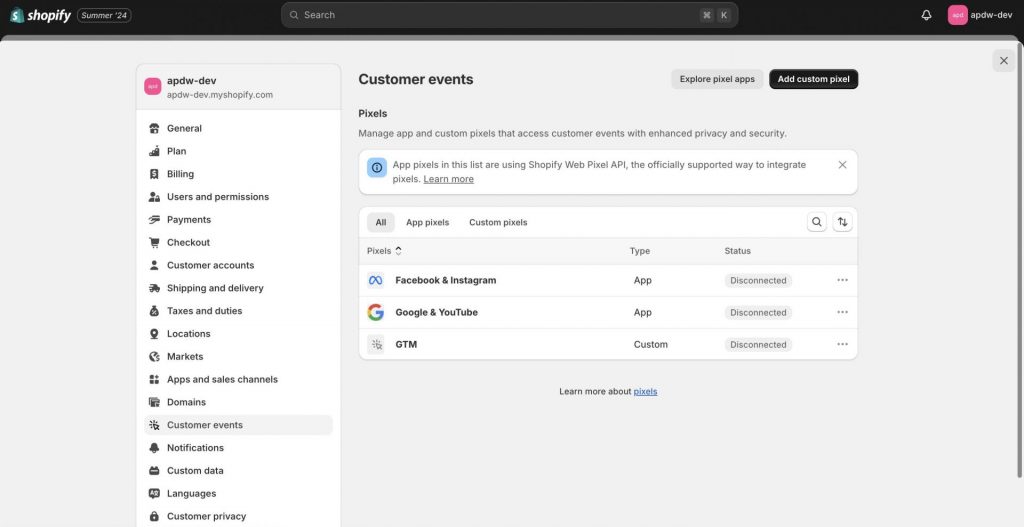
You can find Shopify’s Custom Pixels under Settings –> Customer Events
How to create a Shopify Custom Pixel?
As mentioned above you should go to Settings –> Customer Events.
From there you can click on “Add Custom Pixel“
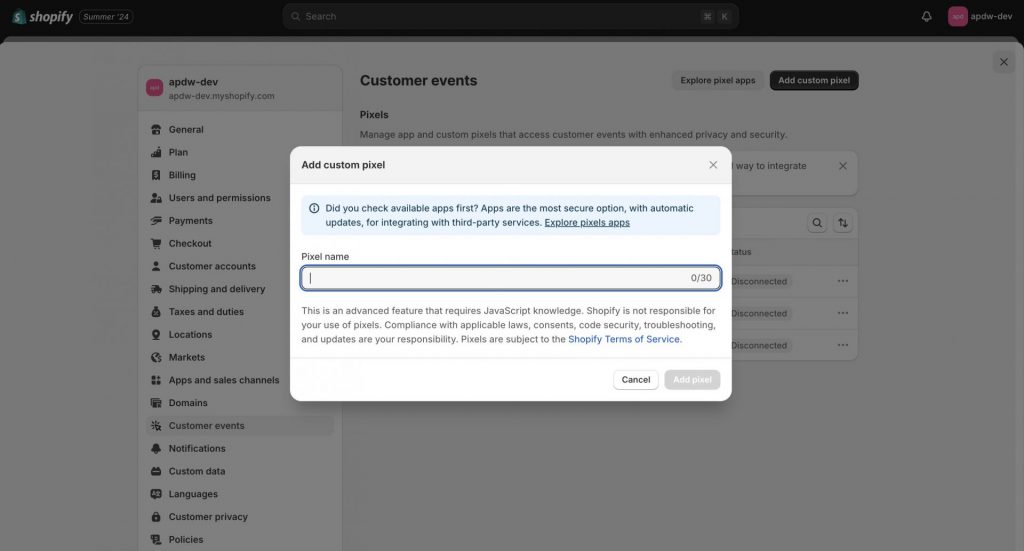
Then you will see a screen where you can do the following
- Customer Privacy
- Edit when the pixel is allowed to fire (will work with consent apps like Pandectes).
- Code
- Edit the code that will load the required.
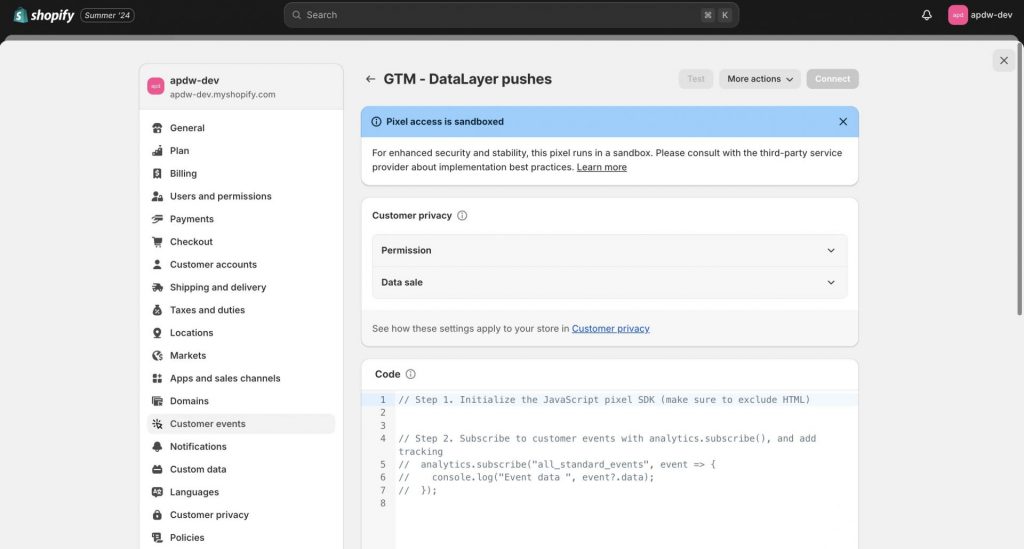
Customer Privacy
This might need a whole blog post on its own (coming soon). But in a nut-shell, Shopify has a so-called Customer Privacy API that allows these custom pixels to listen to consent choice. If you are using a cookie banner like Pandectes, then when user makes a consent choice, Pandectes will make sure they update the consent state inside Shopify’s Customer Privacy API as well. This whole explanation will get too technical real quick, so let’s leave it like this.
Custom Pixel Code
This is where you can add the relevant code that will actually send data to your pixels. Ideally, you want to do the following three steps (in order) in this code
- (Optional) Set consent state
- Load your pixels (‘s snippets)
- Subscribe to events to send data
Set consent state (optional)
If you are using Google Consent Mode, then you first want to set the consent states. You could do this based on the cookies set by your Consent Banner, or “just” use the Customer Privacy API.
Load your pixels
This is where you would add the base tag that most ad platforms tell you to add on page load. Here’s an example for Meta:
<!-- Facebook Pixel Code -->
<script>
  !function(f,b,e,v,n,t,s)
  {if(f.fbq)return;n=f.fbq=function(){n.callMethod?
  n.callMethod.apply(n,arguments):n.queue.push(arguments)};
  if(!f._fbq)f._fbq=n;n.push=n;n.loaded=!0;n.version='2.0';
  n.queue=[];t=b.createElement(e);t.async=!0;
  t.src=v;s=b.getElementsByTagName(e)[0];
  s.parentNode.insertBefore(t,s)}(window, document,'script',
  'https://connect.facebook.net/en_US/fbevents.js');
  fbq('init', '{your-pixel-id-goes-here}');
  fbq('track', 'PageView');
</script>
<noscript>
  <img height="1" width="1" style="display:none"
       src="https://www.facebook.com/tr?id={your-pixel-id-goes-here}&ev=PageView&noscript=1"/>
</noscript>
<!-- End Facebook Pixel Code -->
Subscribe to events to send data
This is where you decide to which events you want to listen, and what data you want to send. You can listen to the following standard events:
- cart_viewed
- Logs when a customer visits the cart page.
- checkout_address_info_submitted
- Logs the submission of a mailing address during checkout, available only with Checkout Extensibility.
- checkout_completed
- Triggered when a purchase is completed, usually on the Thank you page, but for upsells, it’s on the first upsell offer page.
- checkout_contact_info_submitted
- Logs the submission of contact info in a checkout form, available only with Checkout Extensibility.
- checkout_shipping_info_submitted
- Logs the selection of a shipping rate during checkout, also only available with Checkout Extensibility.
- checkout_started
- Logs the initiation of the checkout process, available every time a checkout is started with Checkout Extensibility.
- collection_viewed
- Logs when a customer visits a product collection index page.
- page_viewed
- Logs when a page is visited, available on various store pages including checkout and order status pages.
- payment_info_submitted
- Logs the submission of payment information during checkout.
- product_added_to_cart
- Logs when a product is added to the cart.
- product_removed_from_cart
- Logs when a product is removed from the cart.
- product_viewed
- Logs when a product details page is visited.
- search_submitted
- Logs a performed search, detailing the first product variant listed for each product in the search results.
You can “subscribe” to events with the following code. In the example below we assume we have already added the Facebook base tag as described above. And you would actually want to delete the fbq(‘track’, ‘PageView’) code from the original base tag. Shopify didn’t think to mention this in their confusing tutorial.
analytics.subscribe("page_viewed", async (event) => {
  fbq('track', 'PageView');
});
Shopify also forgets to mention that when you send a PageView like this, Facebook will receive some weird URL that looks like https://www.example.com/wpm@060523f7wbf3b288epddc35263m5ae4e76e/custom/web-pixel-93684047@1/sandbox/modern/ (see end of article “Important Shopify Custom Pixel Limitations“
Create a Google Tag Manager Custom Pixel
So how would we put everything together to load Google Tag Manager in combination with Google Consent Mode and Google Analytics 4? First of all, don’t follow the steps Shopify tells you to follow. These are confusing, and not optimised for the GA4 ecommerce data model.
Here’s the code that I use for my clients. I assume you are using Pandectes as your cookie banner. If you are using something else, let me know and I’ll see if I can edit the code for you.
This code is based on the code provided by Pandectes, and edited to make it work with GA4 e-commerce tracking. You might wonder why I am not using the Customer Privacy API, as this would also allow you to listen to consent state. However, this API doesn’t work on the checkout pages (yet).
let customerPrivacyStatus = init.customerPrivacy;
let LOGGING = true;
let GTM_CONTAINER = "GTM-PTTNZMC"

// CUSTOM LOGGING
function customLog(message) {
  if (LOGGING) {
    const time = new Date().toLocaleTimeString();
    if (typeof message === 'object') {
      // Convert object to string using JSON.stringify with spacing for readability
      message = JSON.stringify(message, null, 2);
    }
    console.log(`%c${time}: ${message}`, 'color: blue; background-color: white;');
  }
}
customLog("Custom pixel loaded")


// SET DATALAYER AND GTAG
window.dataLayer = window.dataLayer || [];
function gtag(){dataLayer.push(arguments);}


// UPDATE URL
try {
    let url = document.location.href;
    let newUrl = url.replace(/\/wpm@.*\/modern/, "");
    const state = {};

    // Update the URL without refreshing the page
    history.pushState(state, '', newUrl);
  customLog(`Succeeded to update URL`)
  } catch (error) {
    customLog(`Failed to update URL`)
}

// SET CUSTOMER DATA IN DATALAYER
let customerData = init.data.customer
if (customerData){
  dataLayer.push({
    customer_email: customerData.email,
    customer_user_id: customerData.id,
    customer_first_name: customerData.firstName,
    customer_last_name: customerData.lastName,
    customer_phone: customerData.phone,
    customer_orders_count: customerData.ordersCount,
    time: new Date().toLocaleTimeString()
  })
}
customLog("customerData set")
customLog(customerData)


// START PANDECTES
const COOKIE_NAME = '_pandectes_gdpr';
const GRANTED = 'granted';
const DENIED = 'denied';

const STORE_DEFAULT_POLICY = DENIED;

const getCookie = (cookieName) => {
    const cookieString = document.cookie;
    const cookieStart = cookieString.indexOf(cookieName + "=");
    if (cookieStart === -1) {
        return null;
    }
    let cookieEnd = cookieString.indexOf(";", cookieStart);
    if (cookieEnd === -1) {
        cookieEnd = cookieString.length;
    }
    const cookieValue = cookieString.substring(cookieStart + cookieName.length + 1, cookieEnd);
    try {
        const  decodedValue = atob(cookieValue);
        const parsedValue = JSON.parse(decodedValue);
        return parsedValue;
    } catch (error) {
        console.error("Error parsing cookie value:", error);
        return null;
    }
};

const getStorage = (cookie) => {
 customLog("Getting consent cookie: ", cookie)
  let output = {
    ad_storage: STORE_DEFAULT_POLICY,
    ad_user_data: STORE_DEFAULT_POLICY,
    ad_personalization: STORE_DEFAULT_POLICY,
    analytics_storage: STORE_DEFAULT_POLICY,
    personalization_storage: STORE_DEFAULT_POLICY,
    functionality_storage: STORE_DEFAULT_POLICY
  };
  if (cookie && cookie.preferences !== null && cookie.preferences !== undefined) {
    const p1 = (cookie.preferences & 1) === 0;
    const p2 = (cookie.preferences & 2) === 0;
    const p4 = (cookie.preferences & 4) === 0;
    output = {
      ad_storage: p4 ? GRANTED : DENIED,
      ad_user_data: p4 ? GRANTED : DENIED,
      ad_personalization: p4 ? GRANTED : DENIED,
      analytics_storage: p2 ? GRANTED : DENIED,
      personalization_storage: p1 ? GRANTED : DENIED,
      functionality_storage: p1 ? GRANTED : DENIED
    };
    CONSENTCHOSEN = true
  }
  return output;
};


const cookie = getCookie(COOKIE_NAME);
const consentState = getStorage(cookie);

// END PANDECTES


// consent mode initialization
gtag('consent', 'default', consentState);
customLog("Google Consent Mode Default State set to ", consentState)


// Dynamically load GTM library
window.dataLayer.push({
    'gtm.start': new Date().getTime(),
    event: 'gtm.js'
});
const script = document.createElement('script');
script.src = `https://www.googletagmanager.com/gtm.js?id=${GTM_CONTAINER}&dataLayer=dataLayer`;
script.async = true;
document.head.appendChild(script);

const eventsToTrackPageLoad = [
  "cart_viewed",
  "collection_viewed",
  "page_viewed",
  "product_viewed",
  "search_submitted"
];

const eventsToTrackDynamic = [
  "product_added_to_cart",
  "checkout_address_info_submitted",
  "checkout_completed",
  "checkout_contact_info_submitted",
  "checkout_shipping_info_submitted",
  "checkout_started",
  "payment_info_submitted",
];

function trackEvent(eventName) {
  analytics.subscribe(eventName, event => {
    customLog(`Event fired: ${event.name}`)
    customLog(event.data)
    customLog(CONSENTCHOSEN)
    var items = []
    var allDiscountCodes = [];
    var allDiscountAmount = 0;
    if (event.data?.checkout){ //checkout events
        allDiscountCodes = event.data?.checkout?.discountApplications.map((discount) => {
        if (discount.type === 'DISCOUNT_CODE') {
          return discount.title;
            }
        });

        allDiscountAmount = event.data?.checkout?.discountApplications.map(function (discount) {
                          if (discount?.value?.percentage){
                            return event.data?.checkout?.totalPrice?.amount / (1 - (discount?.value?.percentage / 100)) - event.data?.checkout?.totalPrice?.amount
                          } else if (discount?.value?.amount) {
                          return parseFloat(discount?.value?.amount);
                        } else{
                          return 0
                        }
                      }).reduce(function (acc, current) {
                          return acc + current;
                      }, 0)

       items = event.data?.checkout?.lineItems.map(item => ({
              item_id: "shopify_NL_" + item.variant?.product?.id + "_" + item.variant?.id,
              item_name: item.variant?.product?.title + " - " + item.variant?.title,
              item_category: item.variant?.product?.type,
              item_brand: item.variant?.product?.vendor,
              item_variant: item.variant?.title,
              price: item.variant?.price?.amount,
              quantity: item.quantity
          }))
   } else if (event.data?.collection?.productVariants) { // collection_viewed
         items = event.data?.collection?.productVariants?.map(item => ({
              item_id: "shopify_NL_" + item.product?.id + "_" + item.id,
              item_name: item.product?.title + " - " + item.title,
              item_category: item.product?.type,
              item_brand: item.product?.vendor,
              item_variant: item.title,
              price: item.price?.amount,
              quantity: item.quantity
          }))
    } else if (event.data?.productVariant) { // product_viewed
         items = [{
              item_id: "shopify_NL_" + event.data?.productVariant?.product?.id + "_" + event.data?.productVariant?.id,
              item_name: event.data?.productVariant?.product?.title + " - " + event.data?.productVariant?.title,
              item_category: event.data?.productVariant?.product?.type,
              item_brand: event.data?.productVariant?.product?.vendor,
              item_variant: event.data?.productVariant?.title,
              price: event.data?.productVariant?.price?.amount,
              quantity: 1
          }]
    } else if (event.data?.cartLine){ //product_added_to_cart
         items = [{
              item_id: "shopify_NL_" + event.data?.cartLine?.merchandise?.product?.id + "_" + event.data?.cartLine?.merchandise?.id,
              item_name: event.data?.cartLine?.merchandise?.product?.title + " - " + event.data?.cartLine?.merchandise?.title,
              item_category: event.data?.cartLine?.merchandise?.product?.type,
              item_brand: event.data?.cartLine?.merchandise?.product?.vendor,
              item_variant: event.data?.cartLine?.merchandise?.title,
              price: event.data?.cartLine?.merchandise?.price?.amount,
              quantity: event.data?.cartLine?.quantity
          }]
    } else if (event.data?.cart){ //view_cart
         items = event.data?.cart?.lines.map(item => ({
              item_id: "shopify_NL_" + item.merchandise?.product?.id + "_" + item.merchandise?.id,
              item_name: item.merchandise?.product?.title + " - " + item.merchandise?.title,
              item_category: item.merchandise?.product?.type,
              item_brand: item.merchandise?.product?.vendor,
              item_variant: item.merchandise?.title,
              price: item.merchandise?.price?.amount,
              quantity: item.quantity
          }))
    }


    dataLayer.push({
      event: event.name,
      time:  new Date().toLocaleTimeString(),
      sent_from: 'custom_pixel',
      page_location: event.context.window.location.href,
      page_title: event.context.document.title,
      ecommerce: {
          transaction_id: event.data?.checkout?.order?.id,
          value: event.data?.checkout?.totalPrice?.amount || event.data?.cartLine?.cost?.totalAmount?.amount || event.data?.cart?.cost?.totalAmount?.amount || event.data?.productVariant?.price?.amount,
          tax: event.data?.checkout?.totalTax?.amount,
          shipping: event.data?.checkout?.shippingLine?.price?.amount ,
          currency: event.data?.checkout?.currencyCode || event.data?.cartLine?.cost?.totalAmount?.currencyCode || event.data?.cart?.cost?.totalAmount?.currencyCode || event.data?.productVariant?.price?.currencyCode,
          coupon: allDiscountCodes.join(', '),
          discount: event.data?.checkout?.discountsAmount?.amount || allDiscountAmount,
          item_list_id: event.data?.collection?.id,
          item_list_name: event.data?.collection?.title,
          items: items
      }
    })
  });
}
customLog("Initial functions set")

// Subscribe to customer events after the GTM script has loaded
script.onload = function(){
customLog("GTM loaded")
let originalUrl = document.location.href;
let parsedUrl = originalUrl.replace(/\/wpm@.*\/modern/, "");

dataLayer.push({event: 'consent_updated',
                sent_from: 'custom_pixel',
                page_location: parsedUrl,
                page_title: document.title,
                consent_chosen: CONSENTCHOSEN,
                time: new Date().toLocaleTimeString()
                  })

// Loop through each event and subscribe to it
eventsToTrackPageLoad.forEach(event => {
      trackEvent(event);
    });
// Loop through each event and subscribe to it
eventsToTrackDynamic.forEach(event => {
    trackEvent(event);
});
};
Here’s a breakdown of what is happening in the script.
- Set some default variables
- You can turn of debugging by changing const DEBUG_MODE = false
- You can stop tracking specific events by commenting them out of the EVENTS_TO_TRACK array
- Set a function to get the Pandectes cookie (getCookie), and to parse this data (getStorage)
- Initiate the dataLayer and set default consent state
- Update the current URL (see below)
- Dynamically load the GTM script
- Subscribe to events when GTM script has loaded
- Send events with all e-commerce data
Important Shopify Custom Pixel Limitations
- Automatically collected events in GA4
- Heatmapping tools (e.g. Hotjar, Microsoft Clarity)
- Scroll tracking
- Existing dataLayer pushes in your liquid files
- Click triggers in GTM
- Automatic Page Views without customisation
I’ll describe all of them in a bit more detail below
Automatically collected events in GA4
As the custom pixels are loaded in a sandbox environment, these pixels don’t have access to your webpages. Therefore, the automatically collected events won’t work. You can recreate some of these events with your custom pixels (see below). Scroll tracking, and video tracking are a lot more complex so I won’t discuss them here.
Outbound Clicks
Here’s the code to recreate click events in GA4. This code is based on the code provided by Shopify. IMPORTANT: This will only work on the checkout page (not sure why it doesn’t work on other pages). But the solution would of course be to have one script in your custom pixel for the checkout pages, and one script in your theme.liquid file for the non-checkout pages.
Note that you would need to add a GA4 event tag in GTM that fires on Custom Event = ‘clicked’. Then you also need to create the dataLayer variables called (click_id, click_value, click_url) and pass them as event parameters in your tag. Don’t forget to add these as custom definitions in the GA4 interface as well.
analytics.subscribe('clicked', (event) => {
  const element = event.data.element;

  // Ensure the element and href property exist
  if (element && element.href) {
    const domain = event.context.window.location.href;
    const elementHref = element.href;
    const url = new URL(elementHref);

    // Check if the href is an outbound link
    if (url.host !== domain) {
      const elementId = element.id;
      const elementValue = element.value;

      dataLayer.push({
        event_name: event.name,
        click_id: elementId,
        click_value: elementValue,
        click_url: elementHref
      });
    }
  }
});
Form Submits
Here’s the code to recreate click events in GA4. This code is based on the code provided by Shopify. IMPORTANT: This will only work on the checkout page (not sure why it doesn’t work on other pages). But the solution would of course be to have one script in your custom pixel for the checkout pages, and one script in your theme.liquid file for the non-checkout pages.
Note that you would need to add a GA4 event tag in GTM that fires on Custom Event = ‘form_submitted’. Then you also need to create the dataLayer variables called (form_id, form_action, form_details) and pass them as event parameters in your tag. Don’t forget to add these as custom definitions in the GA4 interface as well.
analytics.subscribe('form_submitted', (event) => {
  // Example for accessing event data
  const element = event.data.element;

  const elementId = element.id;
  const formAction = element.action;
  const formDetails = element.elements.map((item) => {
    return {
      id: item.id,
      name: item.name,
      value: item.value,
    };
  });

  dataLayer.push({event_name: event.name,
      form_id: elementId,
      form_url: formAction,
      form_details: formDetails,
    })
  })
Site Search
GA4 tracks this by checking if there is a page_view that contains a specific query parameter (q,s,search,query,keyword). Query parameters are parts of the URL that come after a question mark (?). For example: example.com/?query=shoes.
Therefore, it’s relatively easy to recreate this with the following code
const QUERY_PARAMETERS = ["q", "s", "search", "query", "keyword"];

analytics.subscribe('page_viewed', event => {
    const url = new URL(event.context.window.location.href);

    // Check if the URL contains any of the query parameters
    if (QUERY_PARAMETERS.some(param => url.searchParams.has(param))) {
        let searchTerm = null;

        // Iterate over each query parameter and check if it's present in the URL's searchParams
        for (let param of QUERY_PARAMETERS) {
            if (url.searchParams.has(param)) {
                searchTerm = url.searchParams.get(param);
                break; // Stop at the first matching parameter
            }
        }

        // Push the data into the data layer when a search term is found
        if (searchTerm) {
            dataLayer.push({
                event: "view_search_results",
                search_term: searchTerm
            });
        }
    }
});
Heatmapping tools (e.g. Hotjar, Microsoft Clarity)
Unfortunately Shopify doesn’t support heatmapping tool using Custom Pixels (yet). That means you can’t use these tool on your checkout pages.
Like I mentioned before, Custom Pixels work in a sandboxed environment. This means the custom pixels don’t have access to your webpage. And that is exactly what these heatmapping tools need.
Scroll tracking
Unfortunately Shopify doesn’t support scroll tracking using Custom Pixels (yet). That means you can’t use this tool on your checkout pages.
Like I mentioned before, Custom Pixels work in a sandboxed environment. This means the custom pixels don’t have access to your webpage. And that is exactly what you would need for scroll tracking.
Existing dataLayer pushes in your liquid files
As your custom pixels don’t have access to your webpages, they also don’t have access to the dataLayer on those webpages. In fact, with the code that you will probably create in your custom pixel, you will have a separate dataLayer in your sandboxed environment. This means anything that is pushed to dataLayer on the normal page (using your liquid files), won’t be available for your custom pixels.
Shopify suggests you update your current dataLayer pushes from
dataLayer.push({'email_signup', customData});To
Shopify.analytics.publish('email_signup', customData);Click triggers in GTM
As custom pixel run in their sandboxed environment, GTM won’t have access to the actual webpage. This means that any click triggers in GTM won’t work.
You could create a similar code as described in the Outbound Link Tracking, but for now it seems that will only work in your checkout pages. The solution would of course be to have one script in your custom pixel for the checkout pages, and one script in your theme.liquid file for the non-checkout pages.
Automatic Page Views Without Customisation
Let me clarify this, I mean any script that sends allows you to send a pageview, but where you can’t edit the URL that is being sent with that event. An example would be the Meta Pixel
fbq('track', "PageView");With the code above we are sending a PageView, and Facebook automatically collects the page URL by checking window.location.href. This works for the majority of the websites, except for custom pixels inside Shopify.
As I mentioned in the introduction, custom pixels are loaded in iFrames. These iFrames have a specific URL, and that URL is not the URL of your website. So if you send a PageView to Facebook, then Facebook will receive a URL that looks like this: https://www.example.com/wpm@060523f7wbf3b288epddc35263m5ae4e76e/custom/web-pixel-93684047@1/sandbox/modern/
That’s just ugly and incorrect. So to fix this I came up with this solution. I haven’t encountered an issue with this code, but please use it at your own risk. And also if someone has a good reason why we shouldn’t use this code, then let me know. You can add this code somewhere at the top of your custom pixel.
// change current URL so all automatic page views have the correct URL
let url = document.location.href;
newUrl = url.replace(/\/wpm@.*\/modern/, "");
const state = {};
// Update the URL without refreshing the page
history.pushState(state, "", newUrl);
Debugging Custom Pixels
Wondering how to debug custom pixels? That’s a real headache. Google Tag Manager debug mode won’t work for your custom pixels, as (once again) they are running in a sandboxed environment. You also can’t copy the iframe URL and the just try to debug the iFrame URL using GTM debug mode.
Instead, you would use a combination of these approaches
- Network tab in Chrome Developers Tool
- Use a tool like Omnibug
- (Advanced) Console tab in the Chrome Developers Tools
Network tab in Chrome Developers Tool
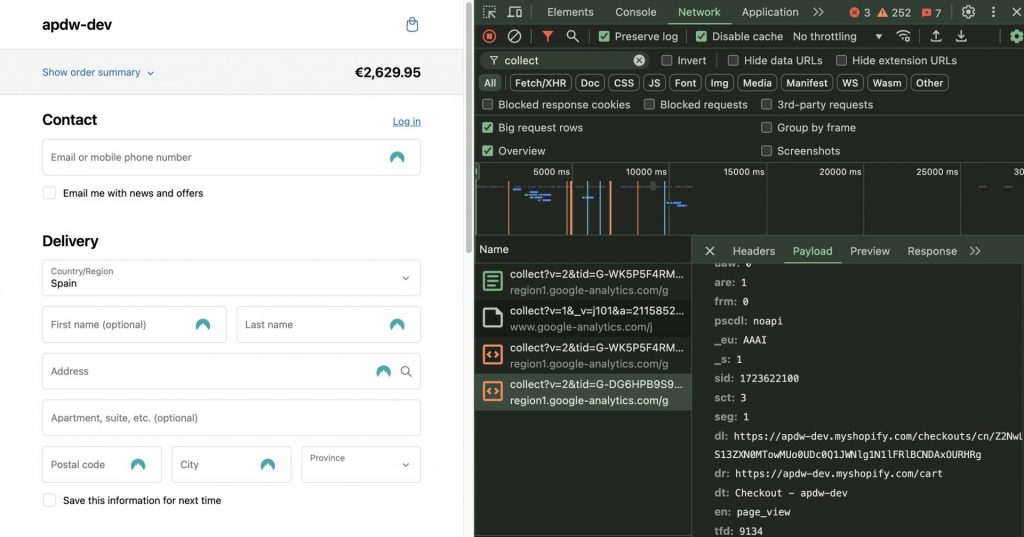
You can check the network tab in the chrome developer tool to see if your events have fired. By searching for any requests with “collect” you can find events that are being sent to GA4. Below you can find an example of a page_view that has been sent to GA4. If you are trying to send an add_payment_info then one of these rows would have to show this event and its corresponding parameters.
Omnibug
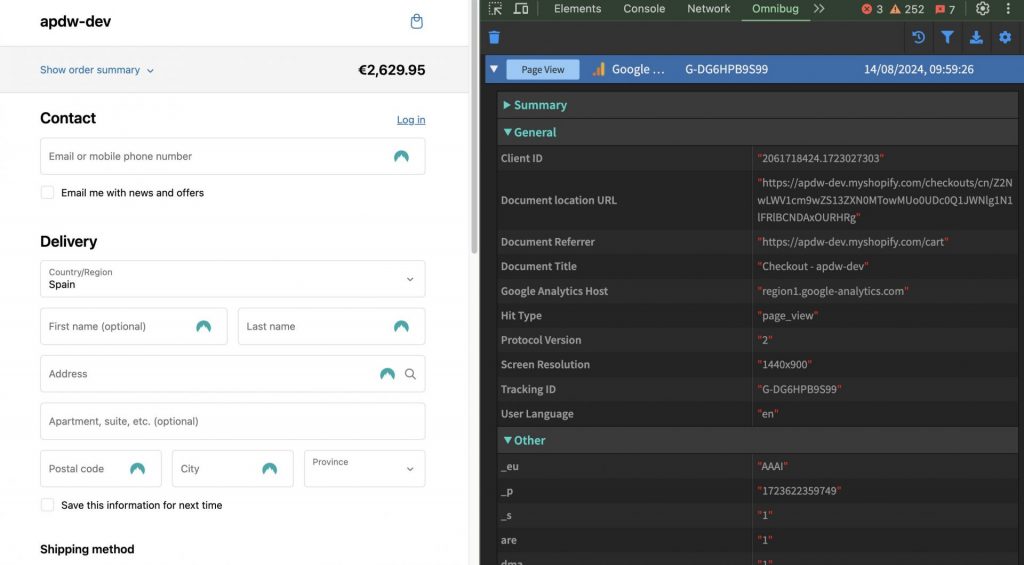
Use a tool like Omnibug to see if your events have fired. This a chrome extension that makes it easier to read all these different network requests that are made to platforms like GA4. Below you can see the same page_view event that we saw in the network request above.
(Advanced) Console tab in Chrome Developers Tool
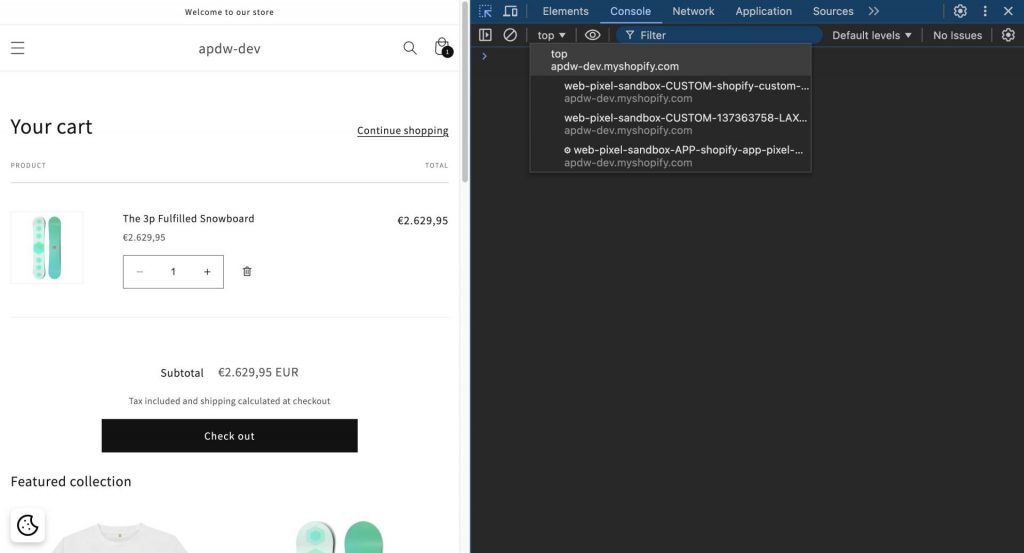
You can use the console tab in the Chrome Developer Tools to see if the dataLayer push has fired successfully. This is a bit more technical so bear with me. As custom pixels are just iFrames, we are able to access the JavaScript inside these iFrames. Chrome Developers Tool allows you to select these iFrames in the console tab.
In the screenshot below you can find a dropdown with the text “top“. This dropdown contains all pixels (custom pixels, but also app pixels). Your custom pixel will look something like web-pixel-sandbox-CUSTOM-123123123-LAX. If you click on this text, you can now access all javascript inside this pixel
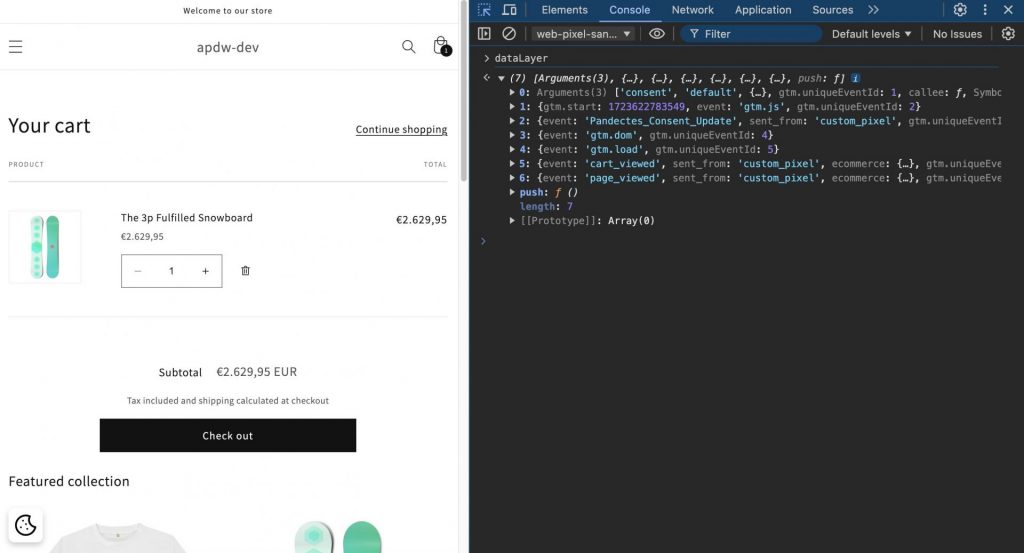
In the screenshot below I have clicked on the text that contained my custom pixel and typed “dataLayer” in the console tab. I can now see all dataLayer pushes that were made to this custom pixel. This will help you identify if your issue has to do with the dataLayer push not firing correctly, or your GTM setup not being correct.
Alternatives to Custom Pixels
So Shopify recommends custom pixels for your tracking. But what other options are there? Here’s a list of alternatives that I use for my clients. Don’t hesitate to contact me if you need help setting up one of tracking solutions.
- Converge (affiliate link)
- Allows you to easily set up client-side and server-side tracking in combination with identity resolution.
- Analyzify
- Easily creates dataLayer pushes for many e-commerce events.
- Stape DataLayer App
- Easily creates dataLayer pushes for many e-commerce events and allows you to send purchases server-side.
Other tools that I haven’t used but that are relevant as well:
- LittleData
- Allows you to easily set up client-side and server-side tracking.
- Taggrs DataLayer App
- Easily creates dataLayer pushes for many e-commerce events.
- Elevar
- Allows you to easily set up client-side and server-side tracking.